Recipes
Lemon Meringue Pie
So today I’m going to show you how to make a lemon meringue pie. This is a great pie because you can make it all year round and don’t really have to worry about seasonal ingredients. The only thing in this recipe that is seasonal is the lemons but considering that groceries get them imported from Florida very frequently and they last forever fresh lemons aren’t too hard to find. Also lemon juice is bottled and shelved in any super market and lasts for months so you have no reason not to make this pie. Now I am not making my own personal pie crust but rather using a pre-made pie crust. However if you want to make the whole pie from scratch here is a recipe for the crust. So let’s get started.
Ingredients:
1 9” Pie Crust, store bought or homemade
For the lemon curd:
1 ½ Cups of Water
1 Cup of Sugar
¼ Cup of Corn Starch
¼ tsp of salt
Zest of 2 large Lemons
Juice of 2 Large Lemons
5 egg Yolks, beaten
For the meringue:
5 Egg Whites
3 Tbsp of Confectioner Sugar
1) Preheat your oven to 350 degrees, put your pie crust in your greased pie pan. Line the inside of the crust with wax paper and fill it with beans or rice. This is called blind baking and will stop your crust from puffing up before adding the curd. Bake for 10 minutes and remove the foil and beans and continue cooking for 15 minutes. 
While the crust bakes make the lemon curd.
2) In a medium sized pot, over medium/low heat, combine together the sugar, corn starch and salt.
3) Them take your 2 lemons and skin the zest off of them, you can do this with a potato peeler if you dont have a zestor. Then I do something different. I take the zest and the water and blend them together until there is only a few chunks of zest in the water. Then I add it to the pot and turn it on medium, you must stir this until it is a nice smooth liquid.


4) Add half a cup of the hot sugar mixture to the egg yolks and whisk to get them up to temperature, this is called tempering so your eggs do not cook in the hot liquid. Add the egg yolk mixture back to the pot with the remaining sugar mixture and cook for about 1 more minute constantly whisking. Set aside. 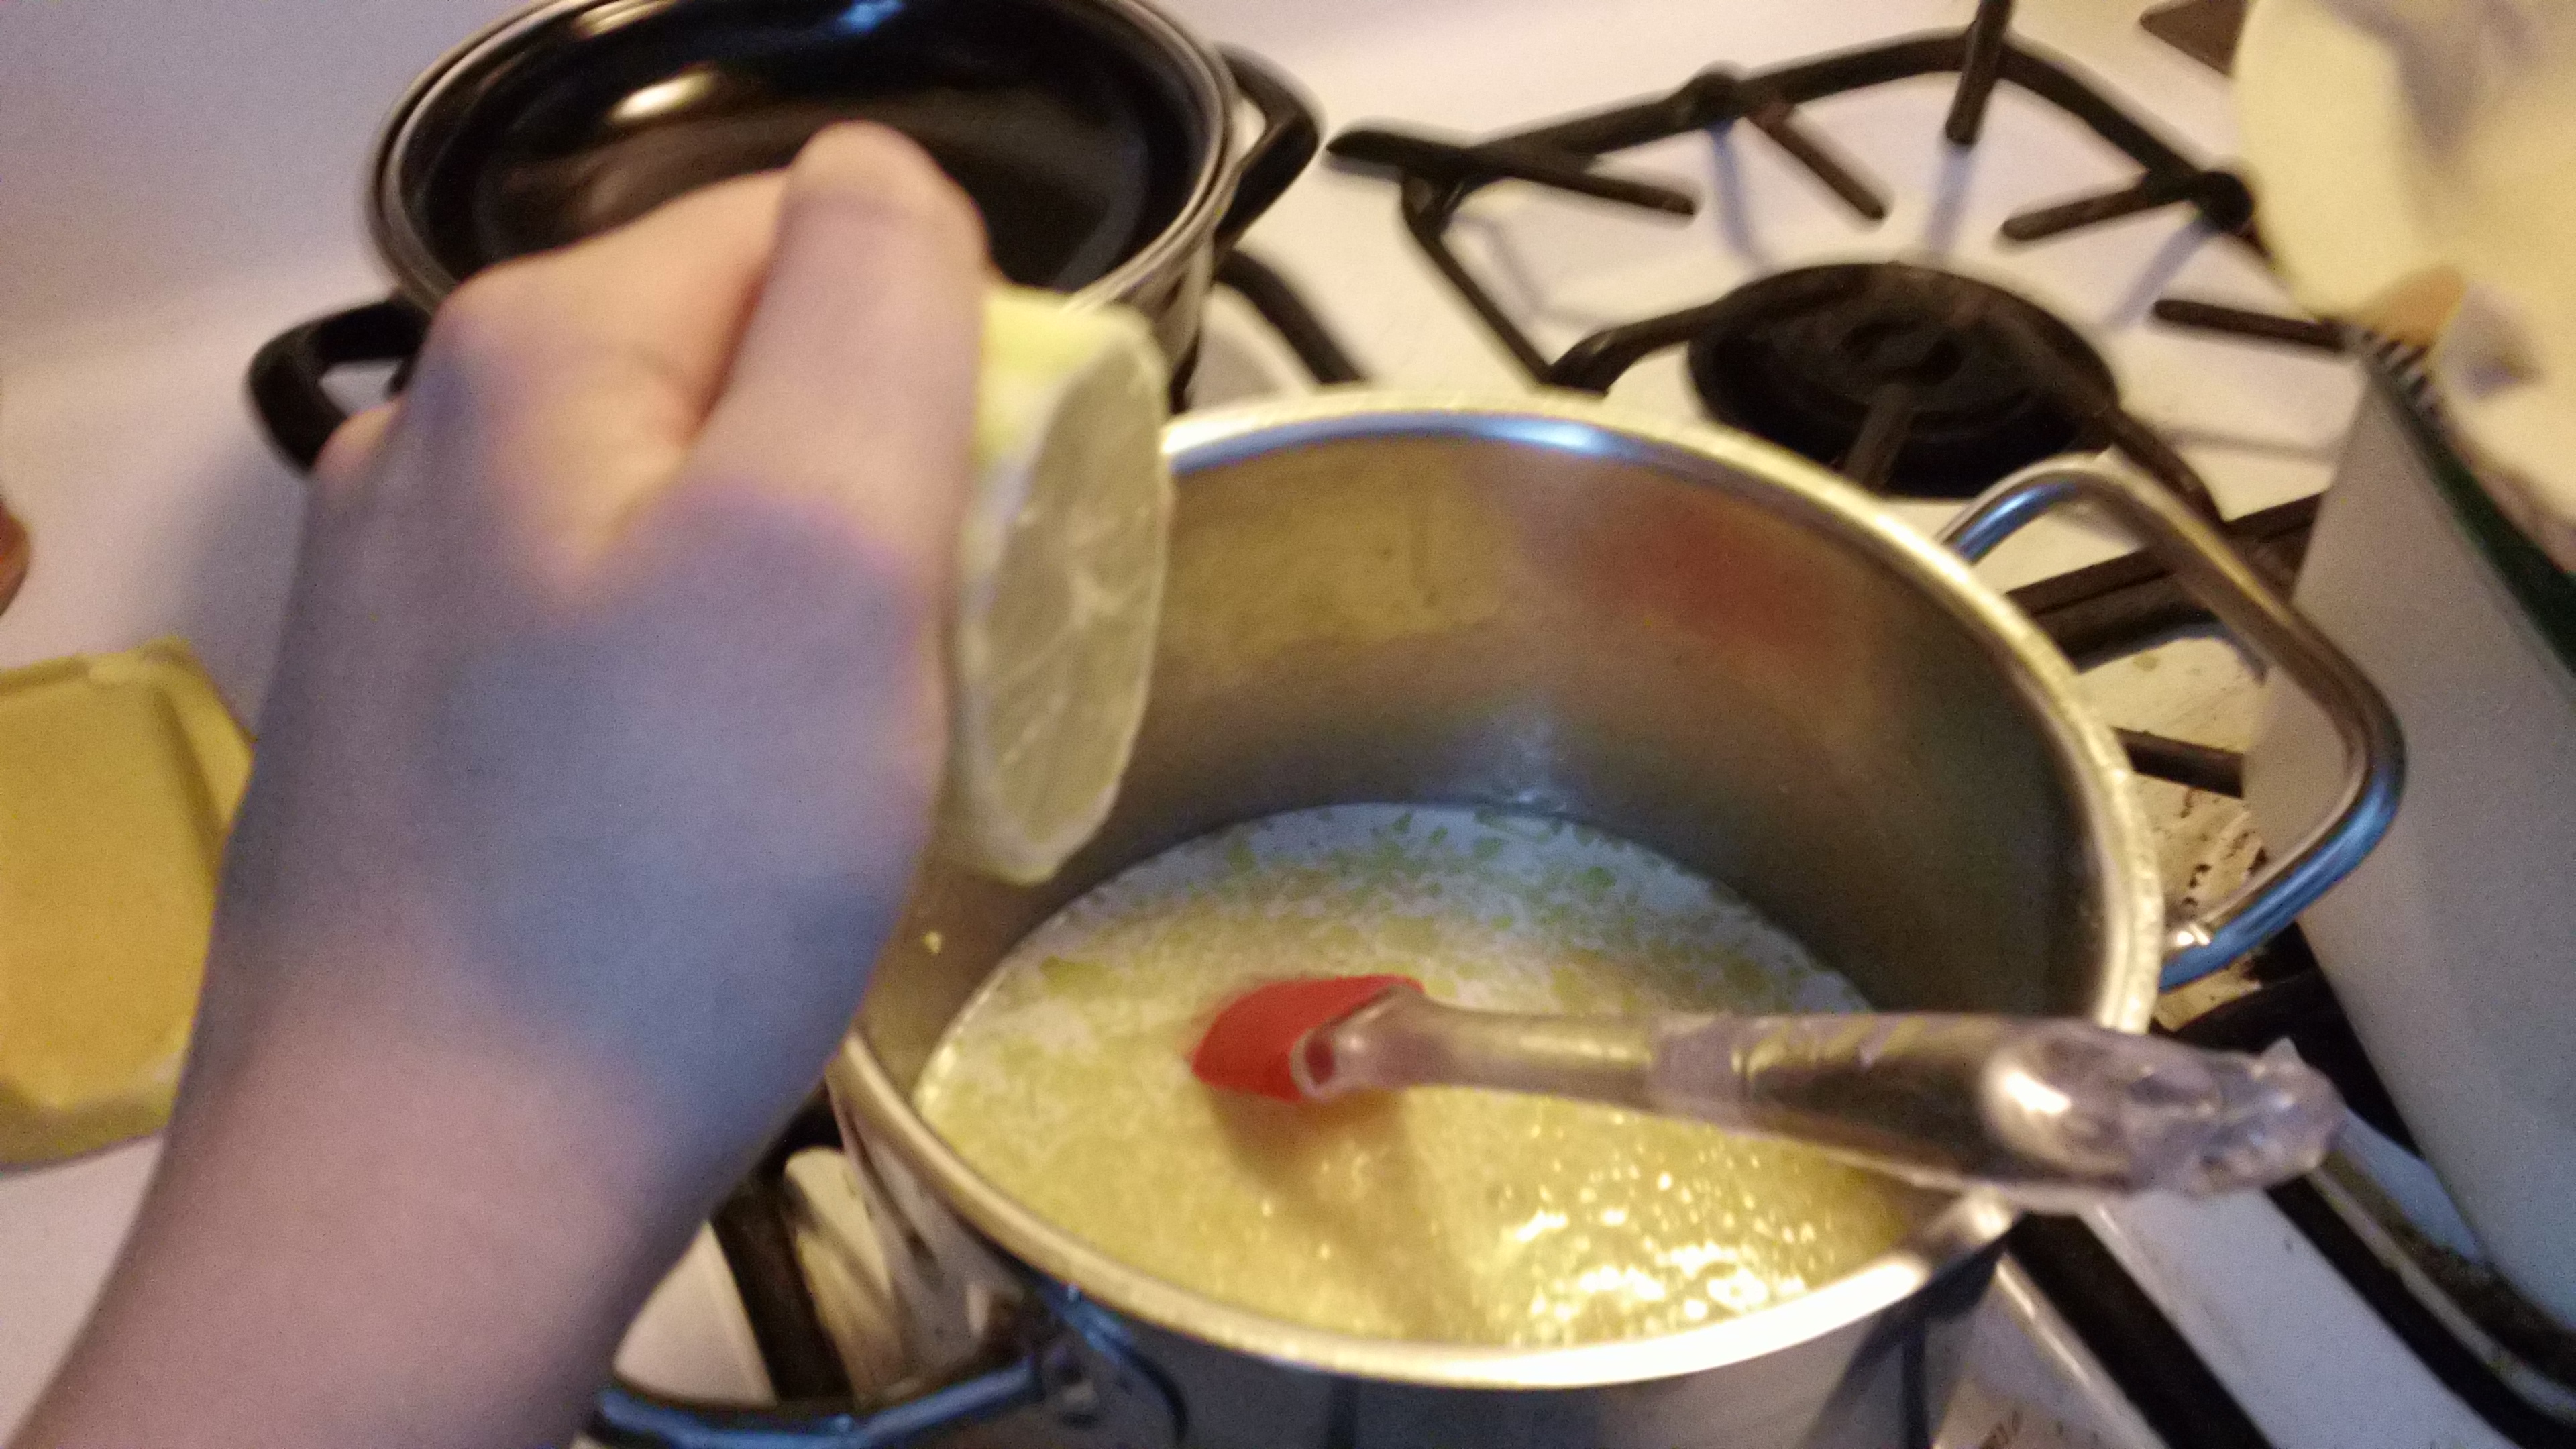
4) To make the meringue, in a large metal bowl whisk the egg whites and slowly add the sugar once the whites start to get foamy. Continue to whisk until they form still peaks, you can tell that it truly is a meringue when you can turn it upside down and it wont fall out.
5) Finally pour the lemon curd into the pie crust and top that with the meringue making sure to form little peaks on the top. Put it back in the oven and bake for 15 minutes or until golden and brown all over the top. This last part is important. You MUST let your pie COOL DOWN for at least TWO HOURS before eating. This way the curde can settle and wont spill out when you cut your pieces for your pie. Enjoy!
If you want to make your meringue a little more posh then try this recipe.
Related articles
- All Things Meringue (thecakelair.wordpress.com)
- Lemon Meringue Pie In A Martini Glass! (mix965houston.cbslocal.com)
Pumpkin scones and Pumpkin Muffins
So this weeks recipe is going to be a double recipe. The reason for this is because I have sooooo much pumpkin in my fridge that I am having to come up with new ways to use it all. Which is why this week I’ve decided to make pumpkin scones and pumpkin muffins. The reason why I chose to do these two at once is because they nearly have the exact same ingredients in them but taste different you won’t feel like you’re eating the same thing over and over again. I know everyone knows what a muffin is but maybe not a scone? Scones are like a hybrid between biscuits and cake. Now that I’ve explained this concept, let’s get started!
Lets start with the muffins
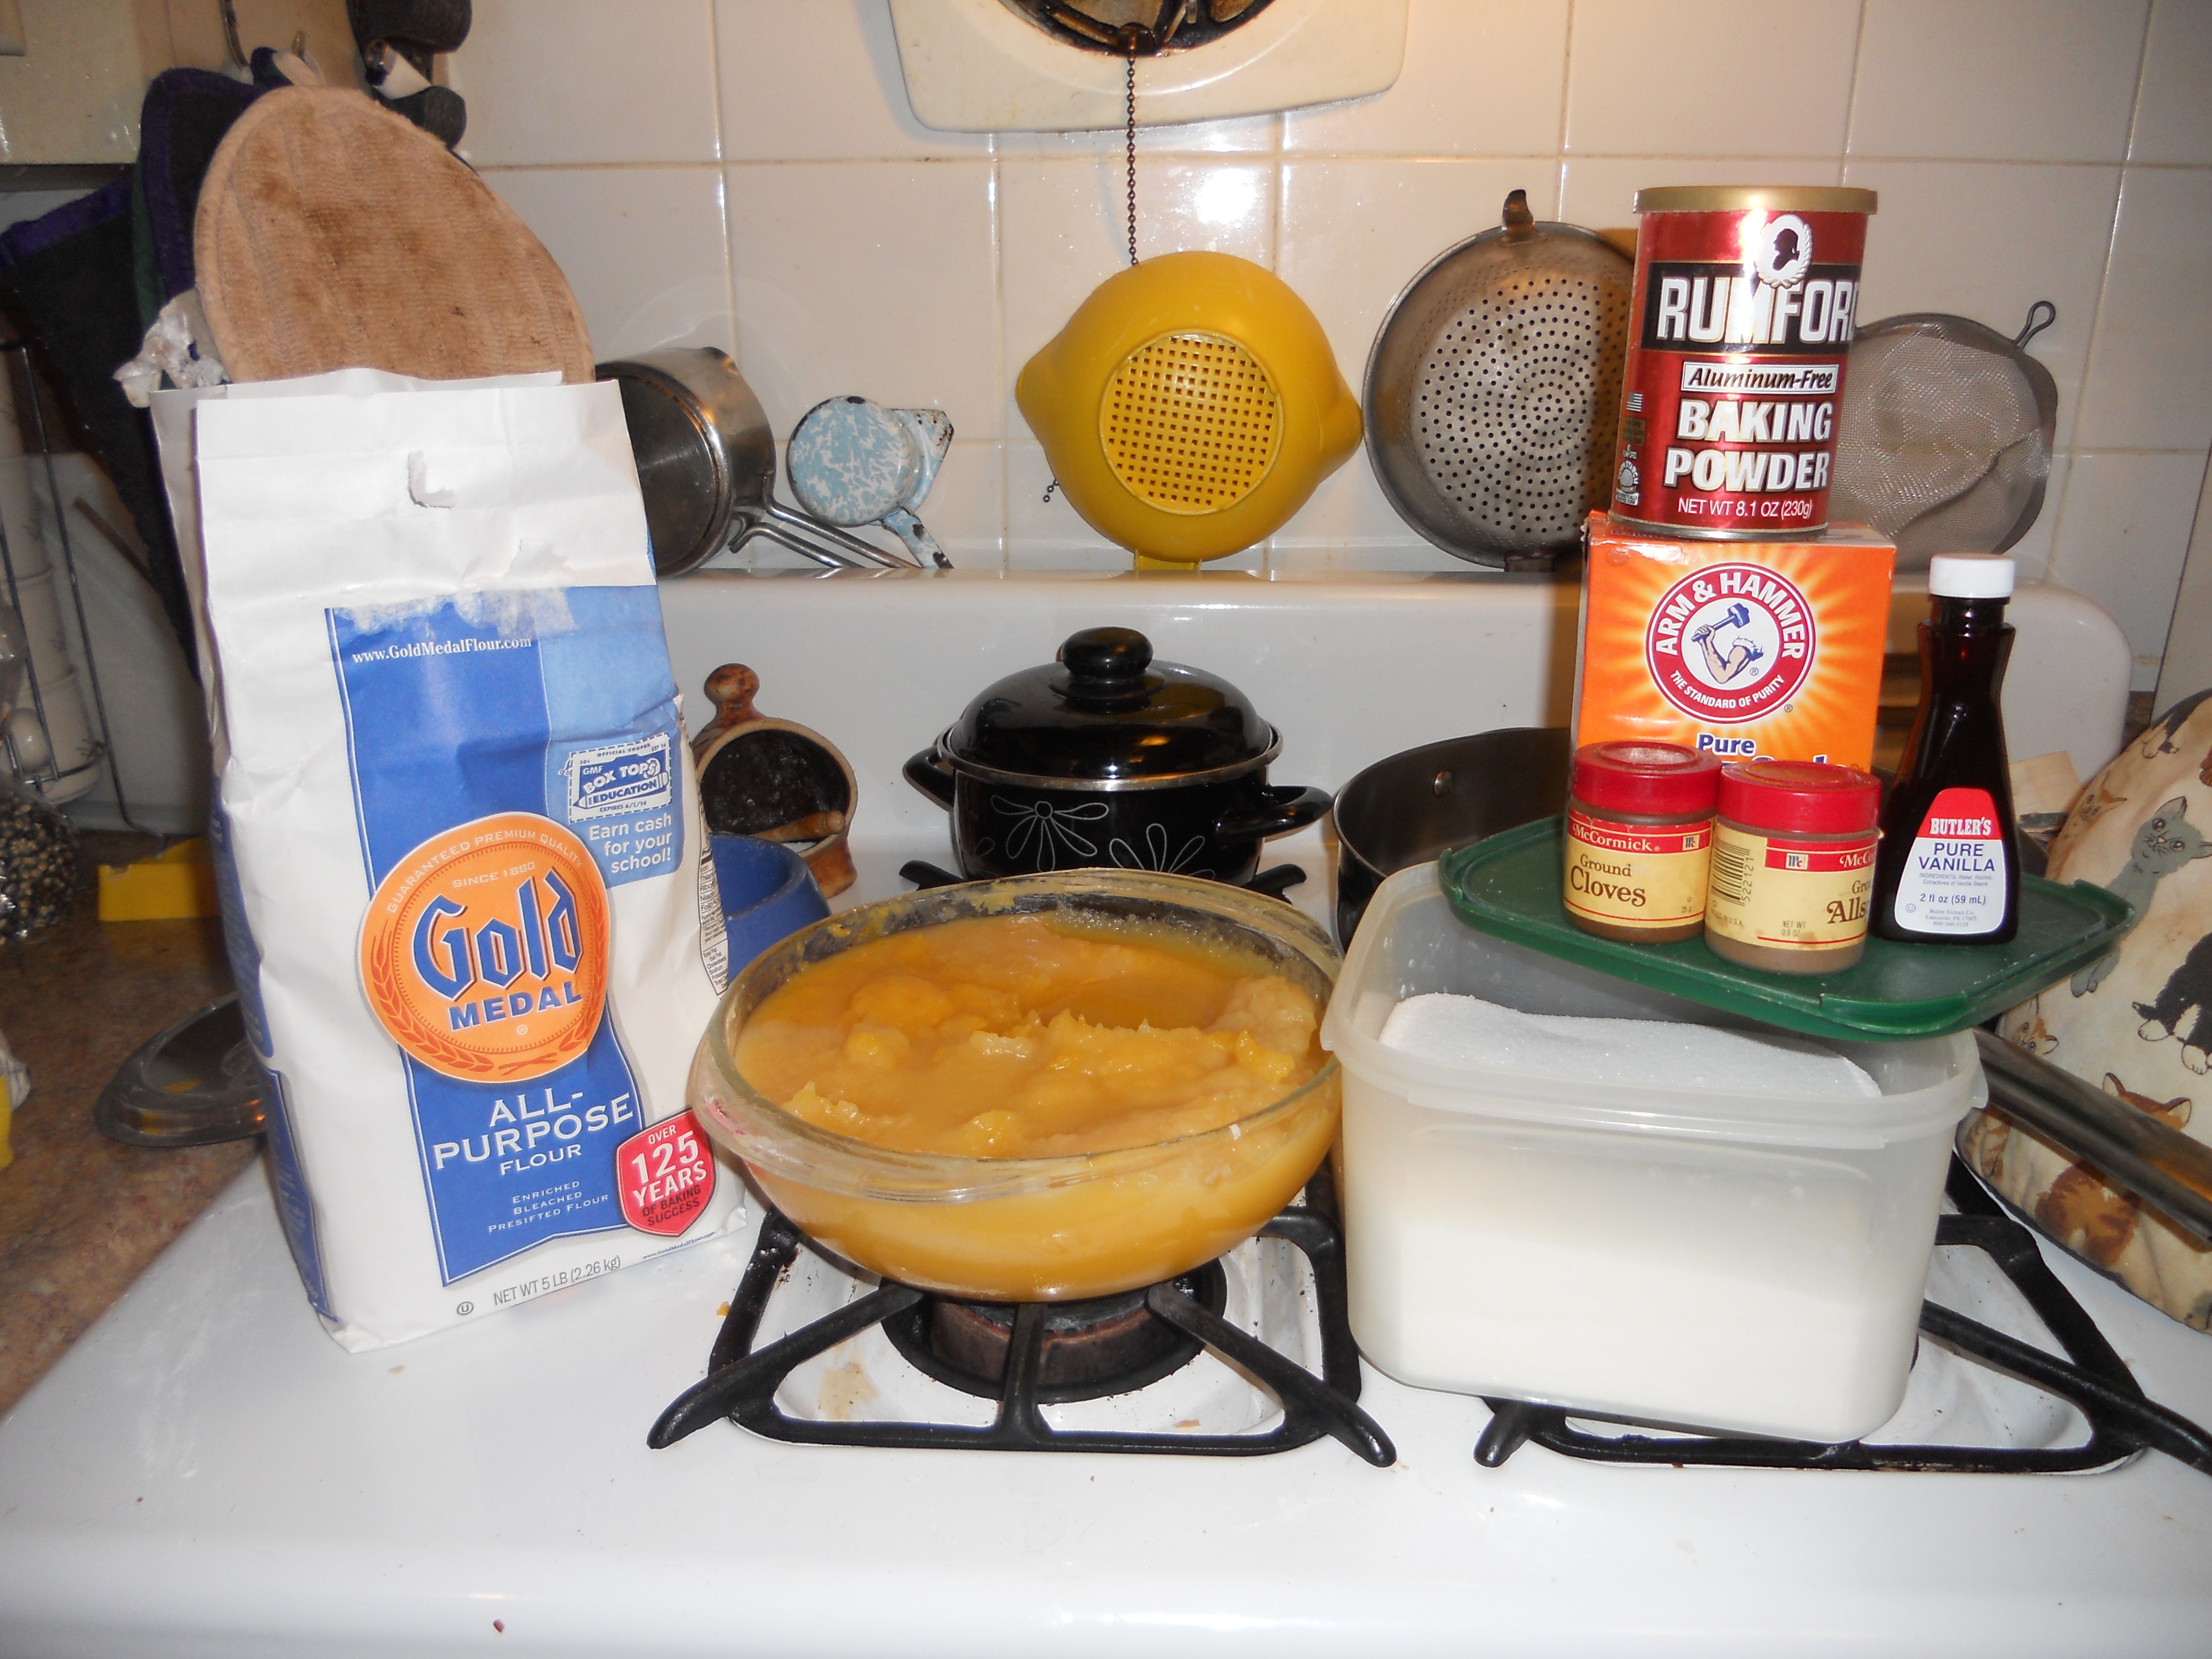
Ingredients:
1 cup of Sugar
1 cup of All Purpose Flour
1/3 cup of Vegetable Oil
2 Eggs
½ tsp of Vanilla Extract
¾ cup of Pure Pumpkin Puree
1 tsp of pumpkin pie spice
1 tsp of Baking Soda
½ tsp of Baking Powder
¼ tsp of Salt
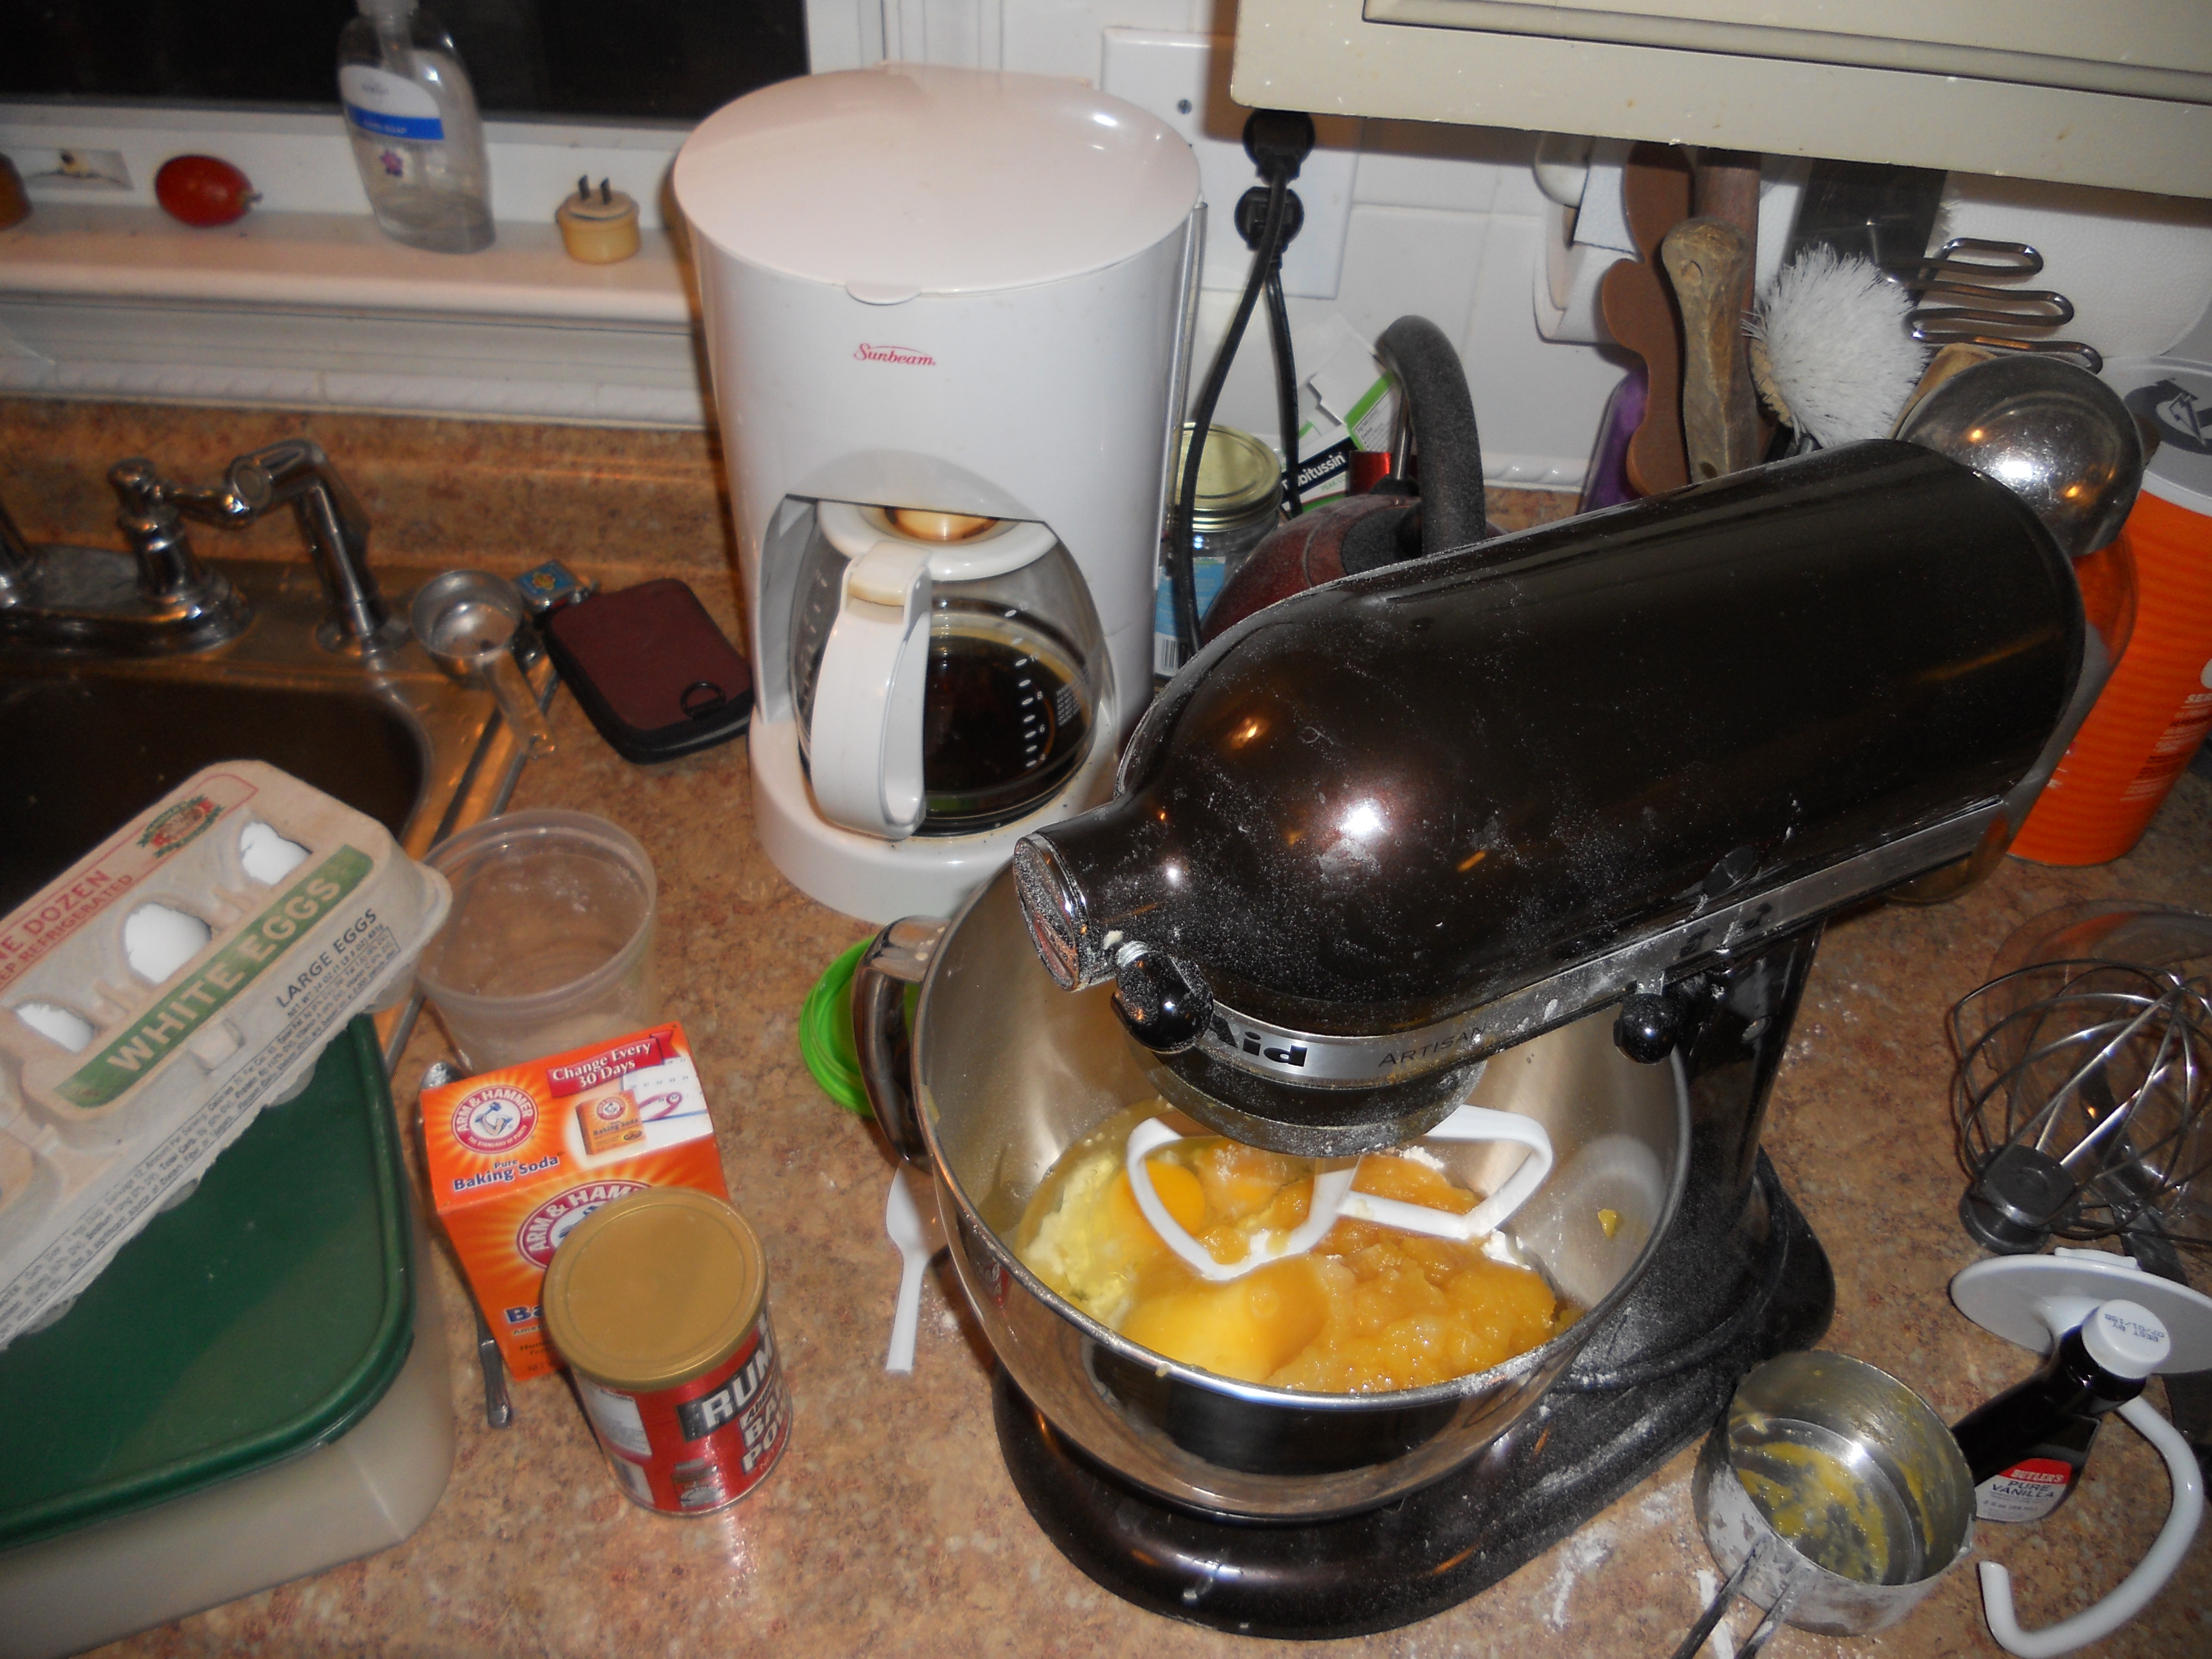
1sr. Preheat your oven to 350 degrees and spray your muffin tins
2nd. Take your sugar, vegetable oil, vanilla, eggs and pumpkin puree and combine them together. Once these ingredients are evenly incorporated add your dry ingredients of the flour, baking soda, baking powder and salt and stir until all are perfectly combined together.
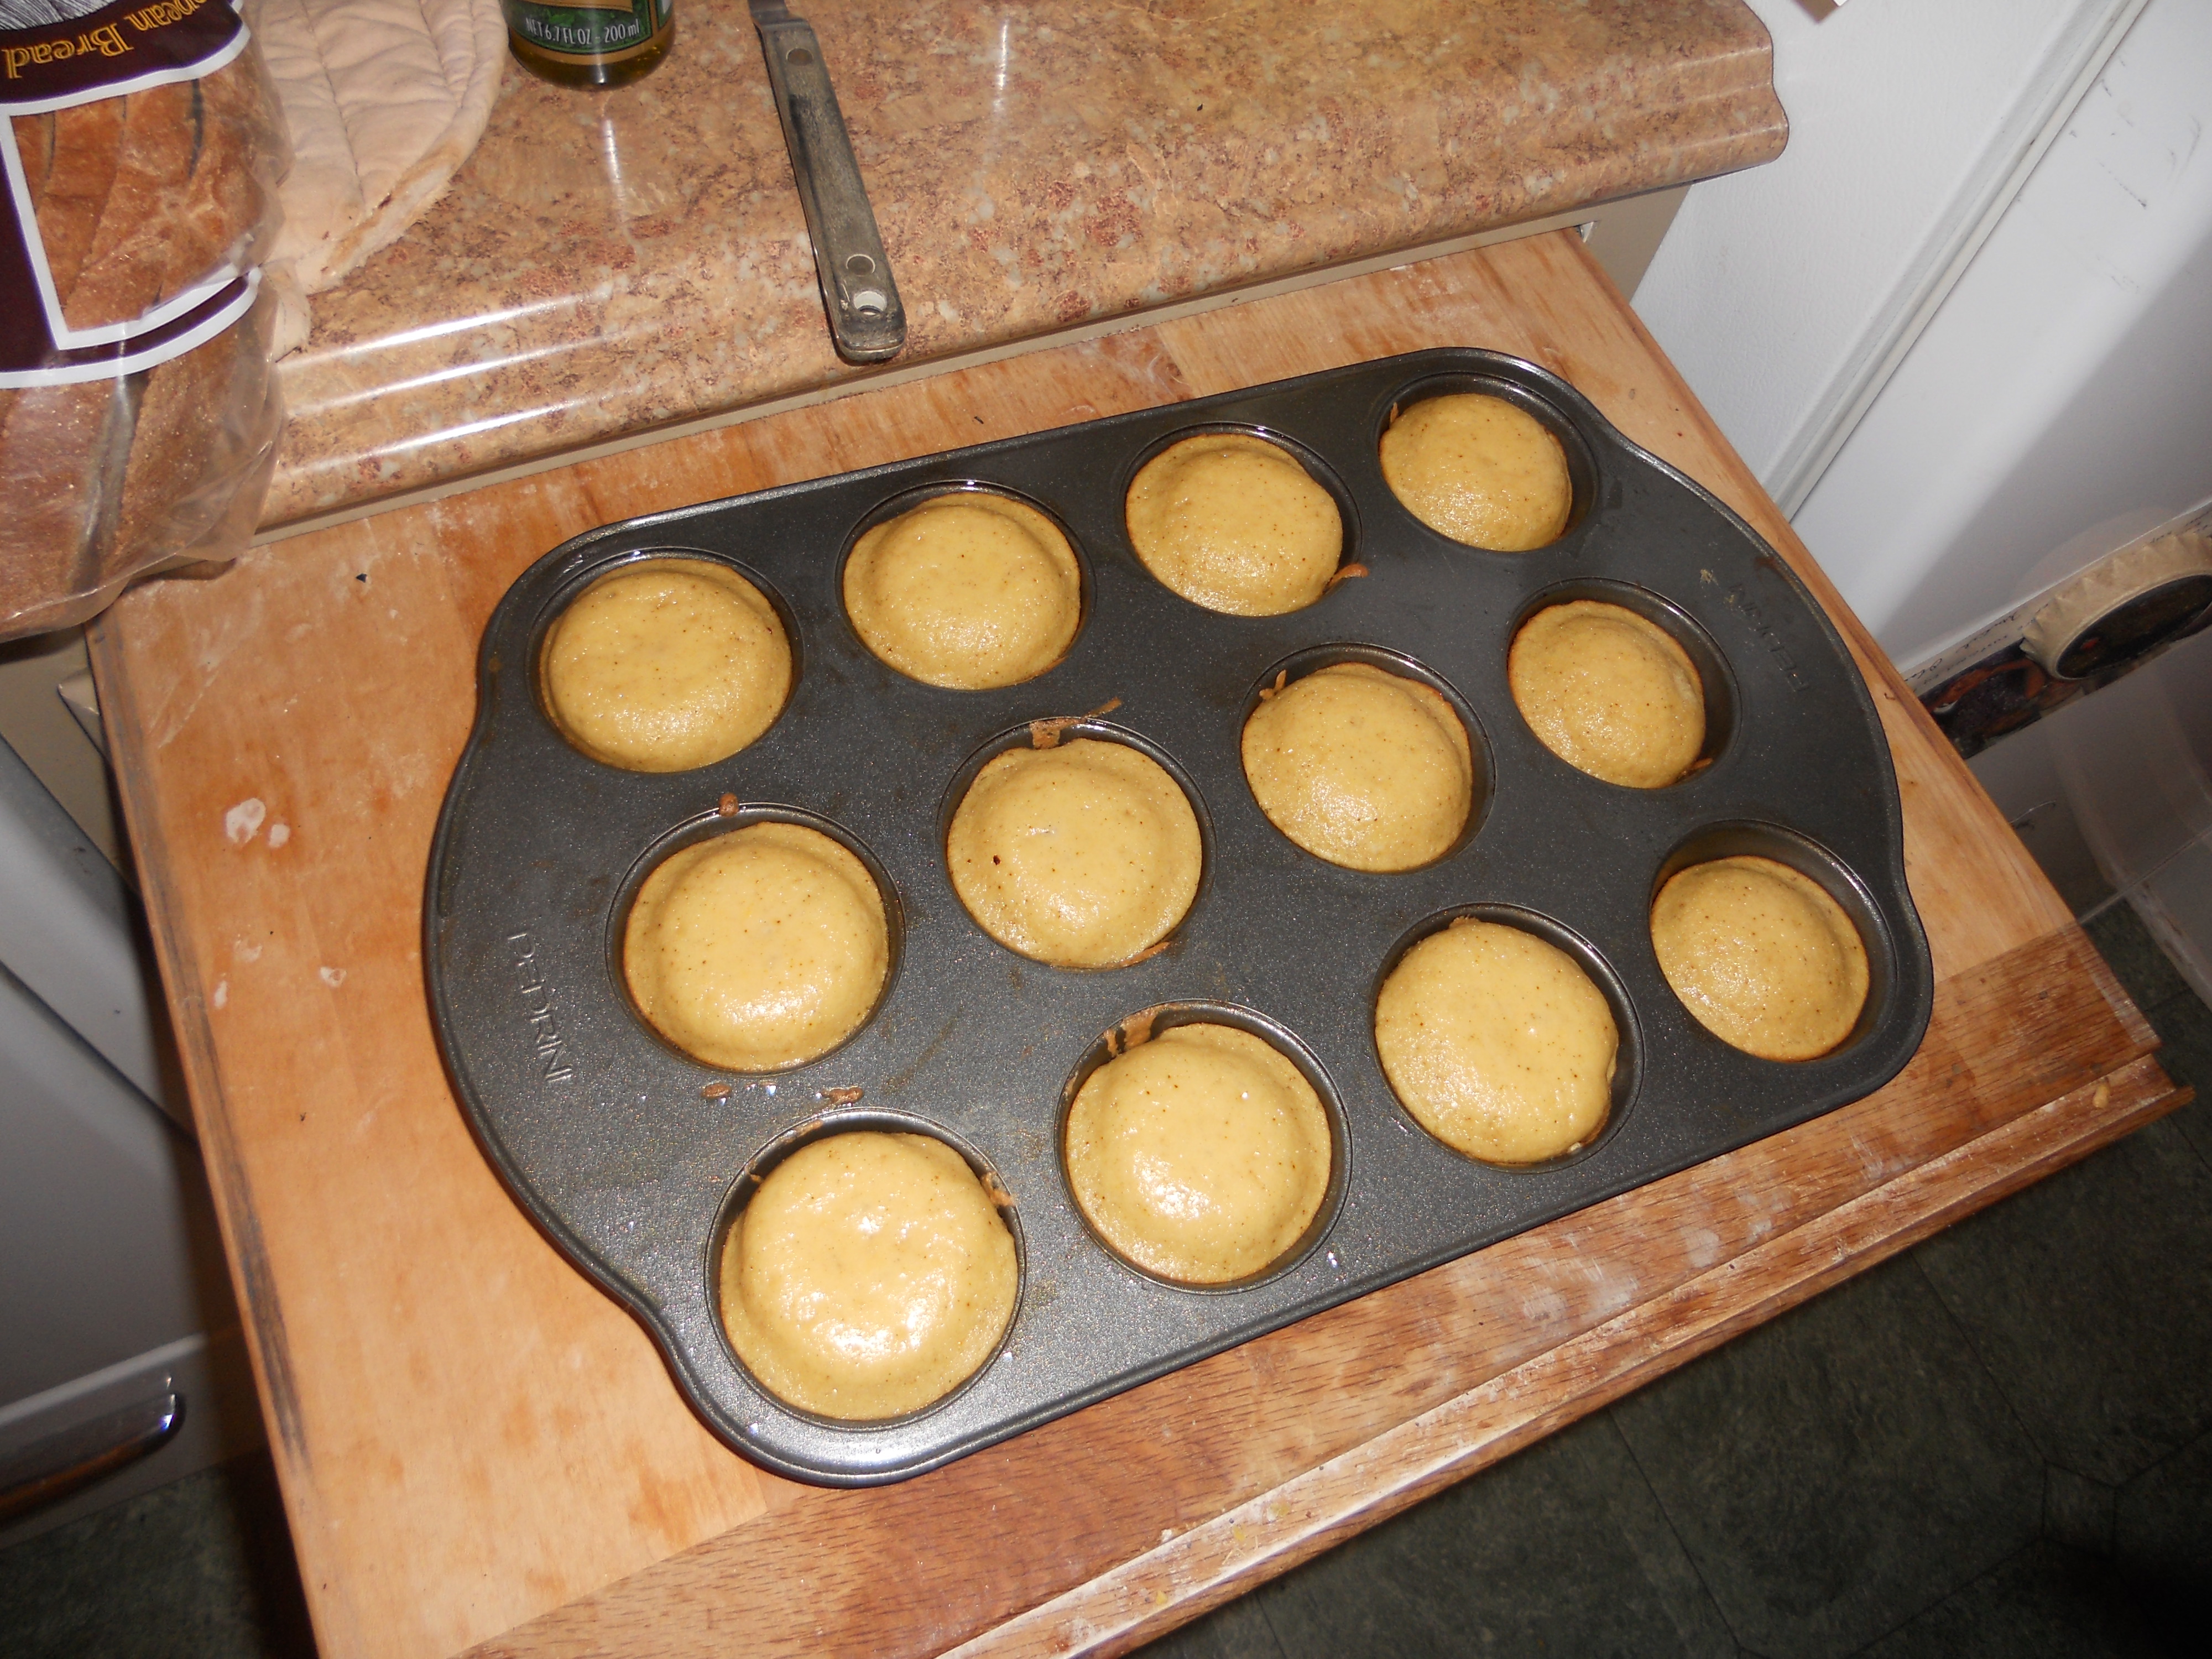
3rd. add your mix to the tray
4th. put the muffins into the oven for 20 to 25 minutes.
You can make the muffins taste more special by making a nice icing to go on top of your muffins.
Now I’m going to show you how to make scones!
If you want a healthier alternative try these muffins
Ingredients:
2-1/2 cups of Flour
1/4 cup of Granulated Sugar
1/4 cup of Brown Sugar
1 1/2 tsp Baking Powder
1/4 tsp Baking Soda
1/2 tsp Salt
8 Tbsp Cold Unsalted Butter
1/2 cup Heavy Cream
1/2 tsp of Vanilla Extract
1/3 cup of Pumpkin Puree
2 tsp of Pumpkin Pie Spice
1 Egg
1st. Change the setting of the oven to 400 degrees and grease a cookie sheet, or put wax paper down.
2nd. Combine the dry ingredients of flour, sugars, baking powder, baking soda, pumpkin pie spice and salt in your bowl.
3rd. Add the cold butter and mix until it is broken up into the mixture.
4th. Add the egg, pumpkin puree, cream and pumpkin puree into the dry mixture and mix until it forms a
dough like consistency.
5th. Put your scone dough onto a sheet and mold it into a square or circle then cut it into the desired shapes
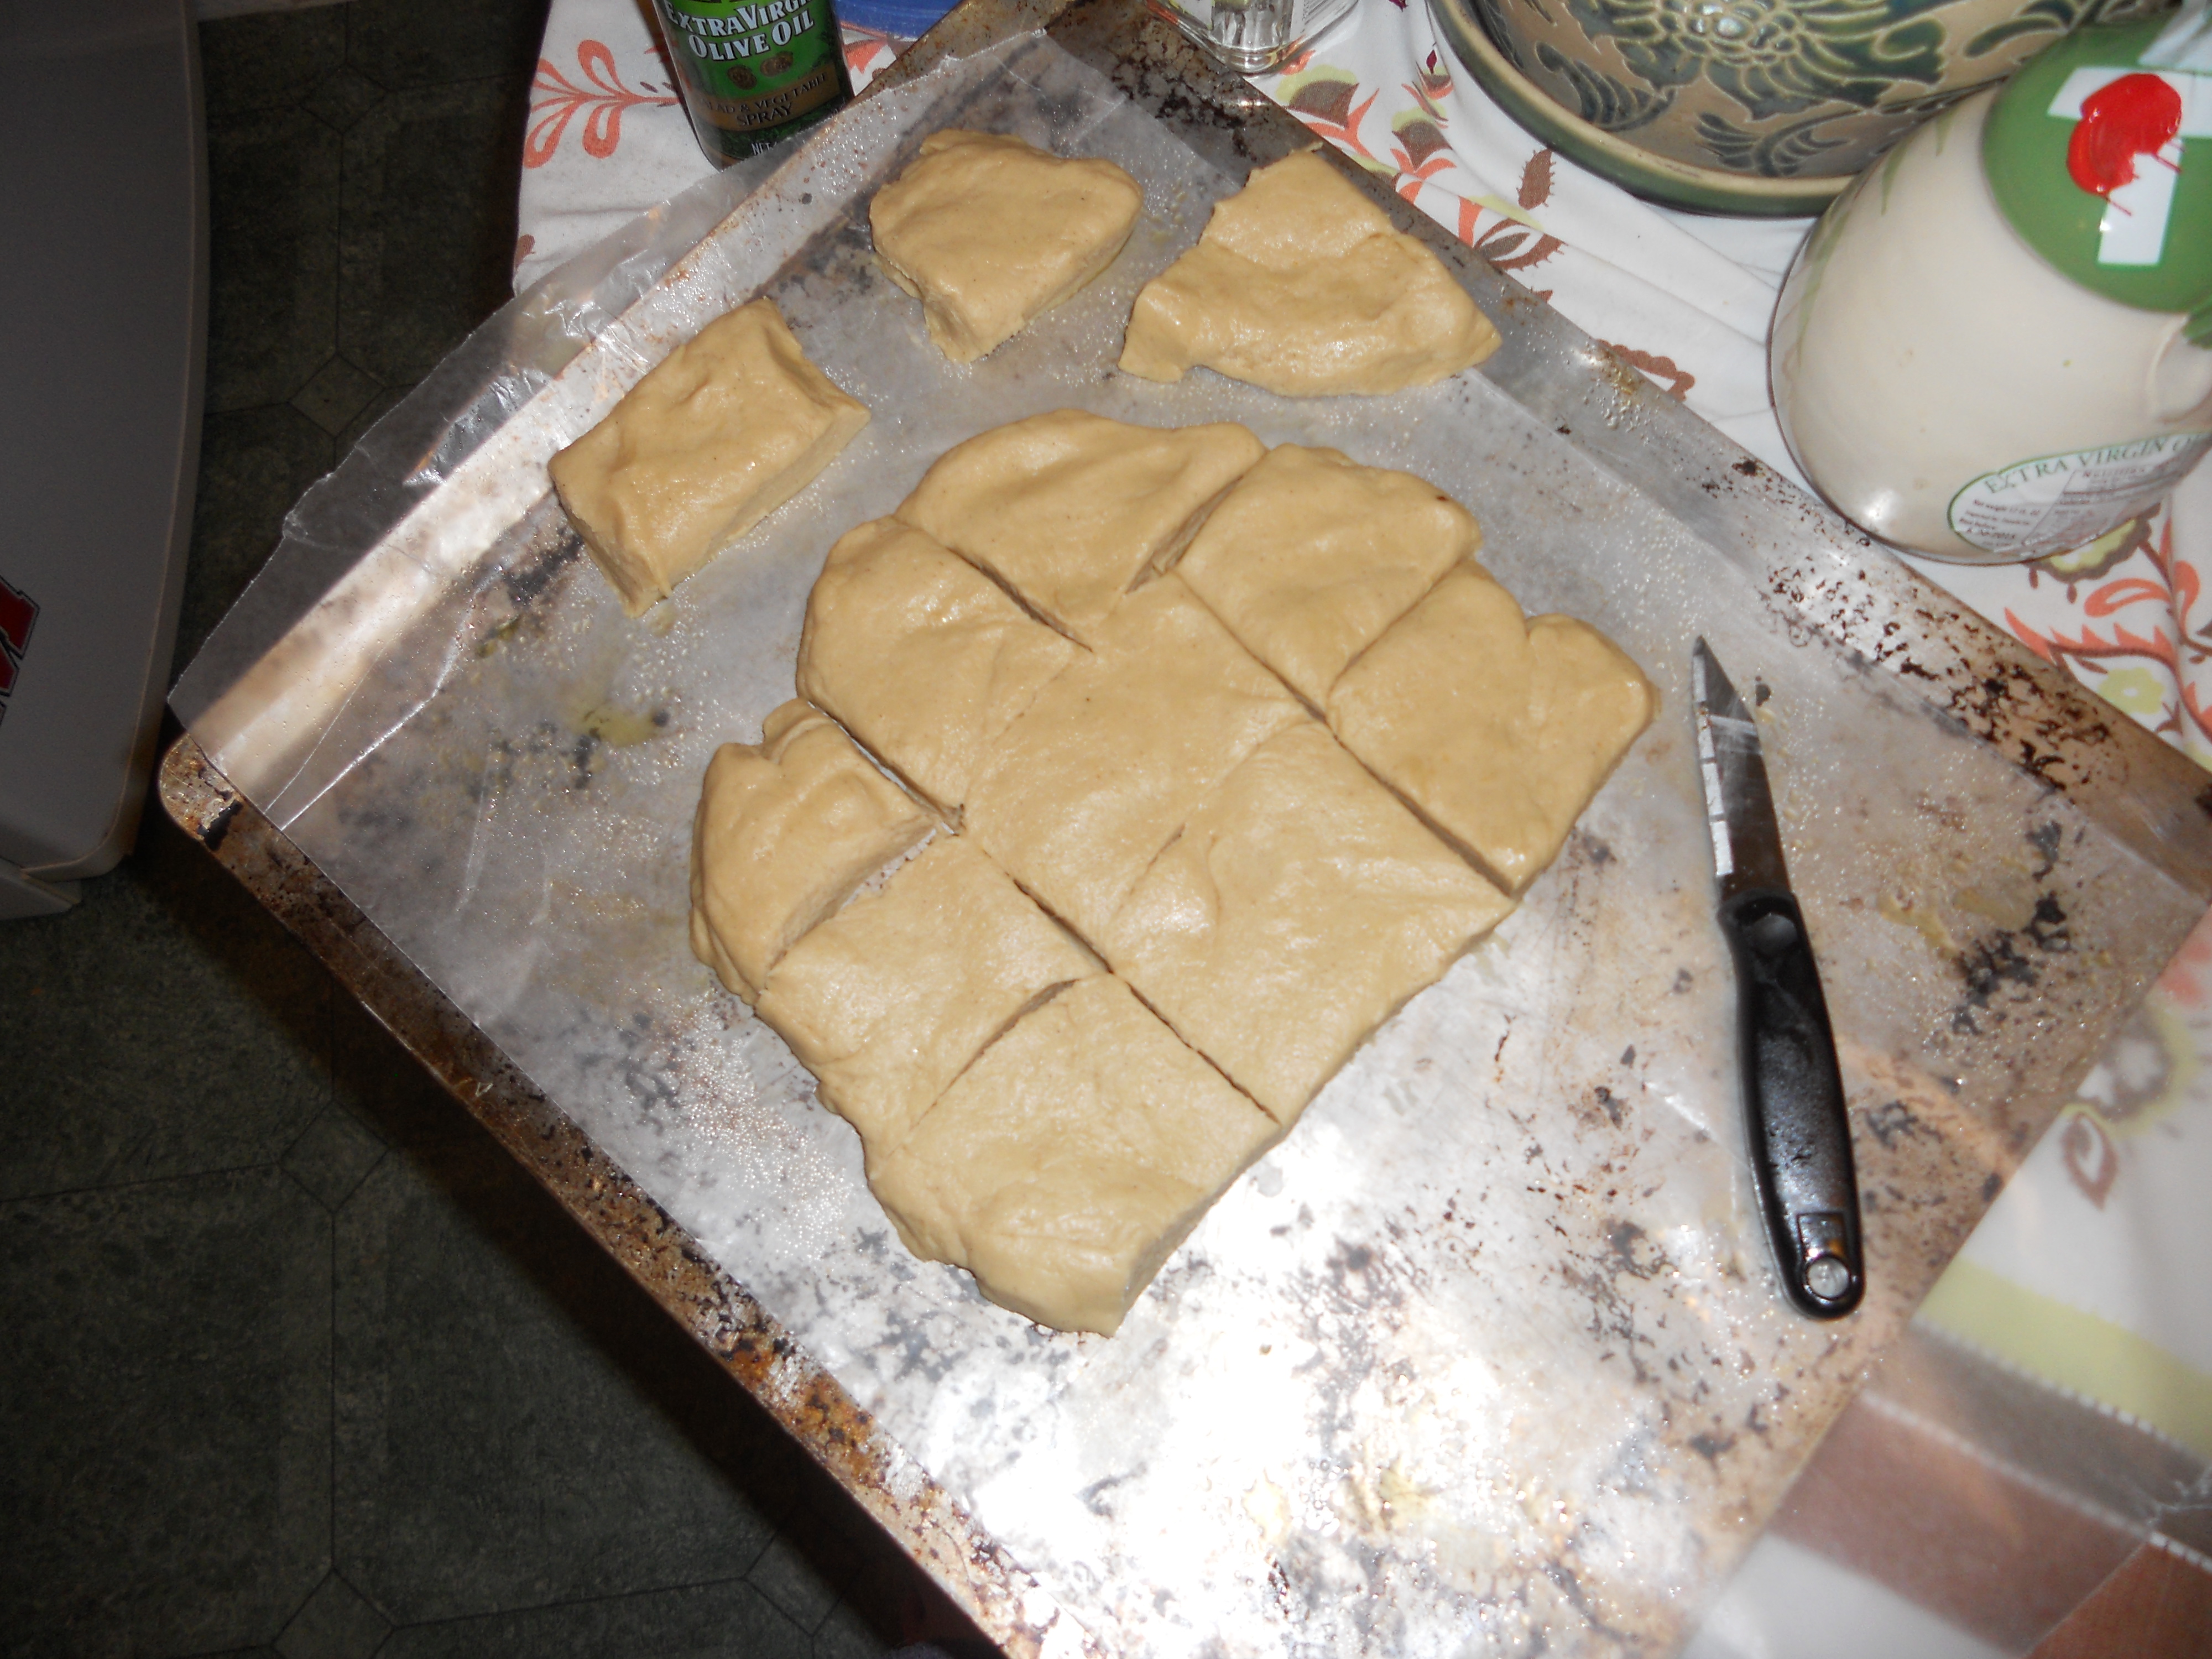
6th. Lay them out on your tray and put them into the oven for 18 minutes or until golden brown then enjoy

If you want a more fancy scone then try this recipe for pumpkin almond scones with a brown-butter glaze.
484 words
Dried Chili Peppers
So you know when you’re at pizza place and you look at your condiments and there’s the usual. Salt, pepper, ketchup. Then there is the parmesan cheese and one with these little red flakes. That is actually dried chili peppers, they give the pizza an extra kick. Chili flakes can be used to spice up any meal, not just pizza. It’s also a nice way to get rid of the peppers that you grow in the summer since you can’t just eat raw chili peppers and there is only so much you can put them in before you start to go crazy from all the spice! This way you can use as much as you want throughout the year, plus it’s sure easy.
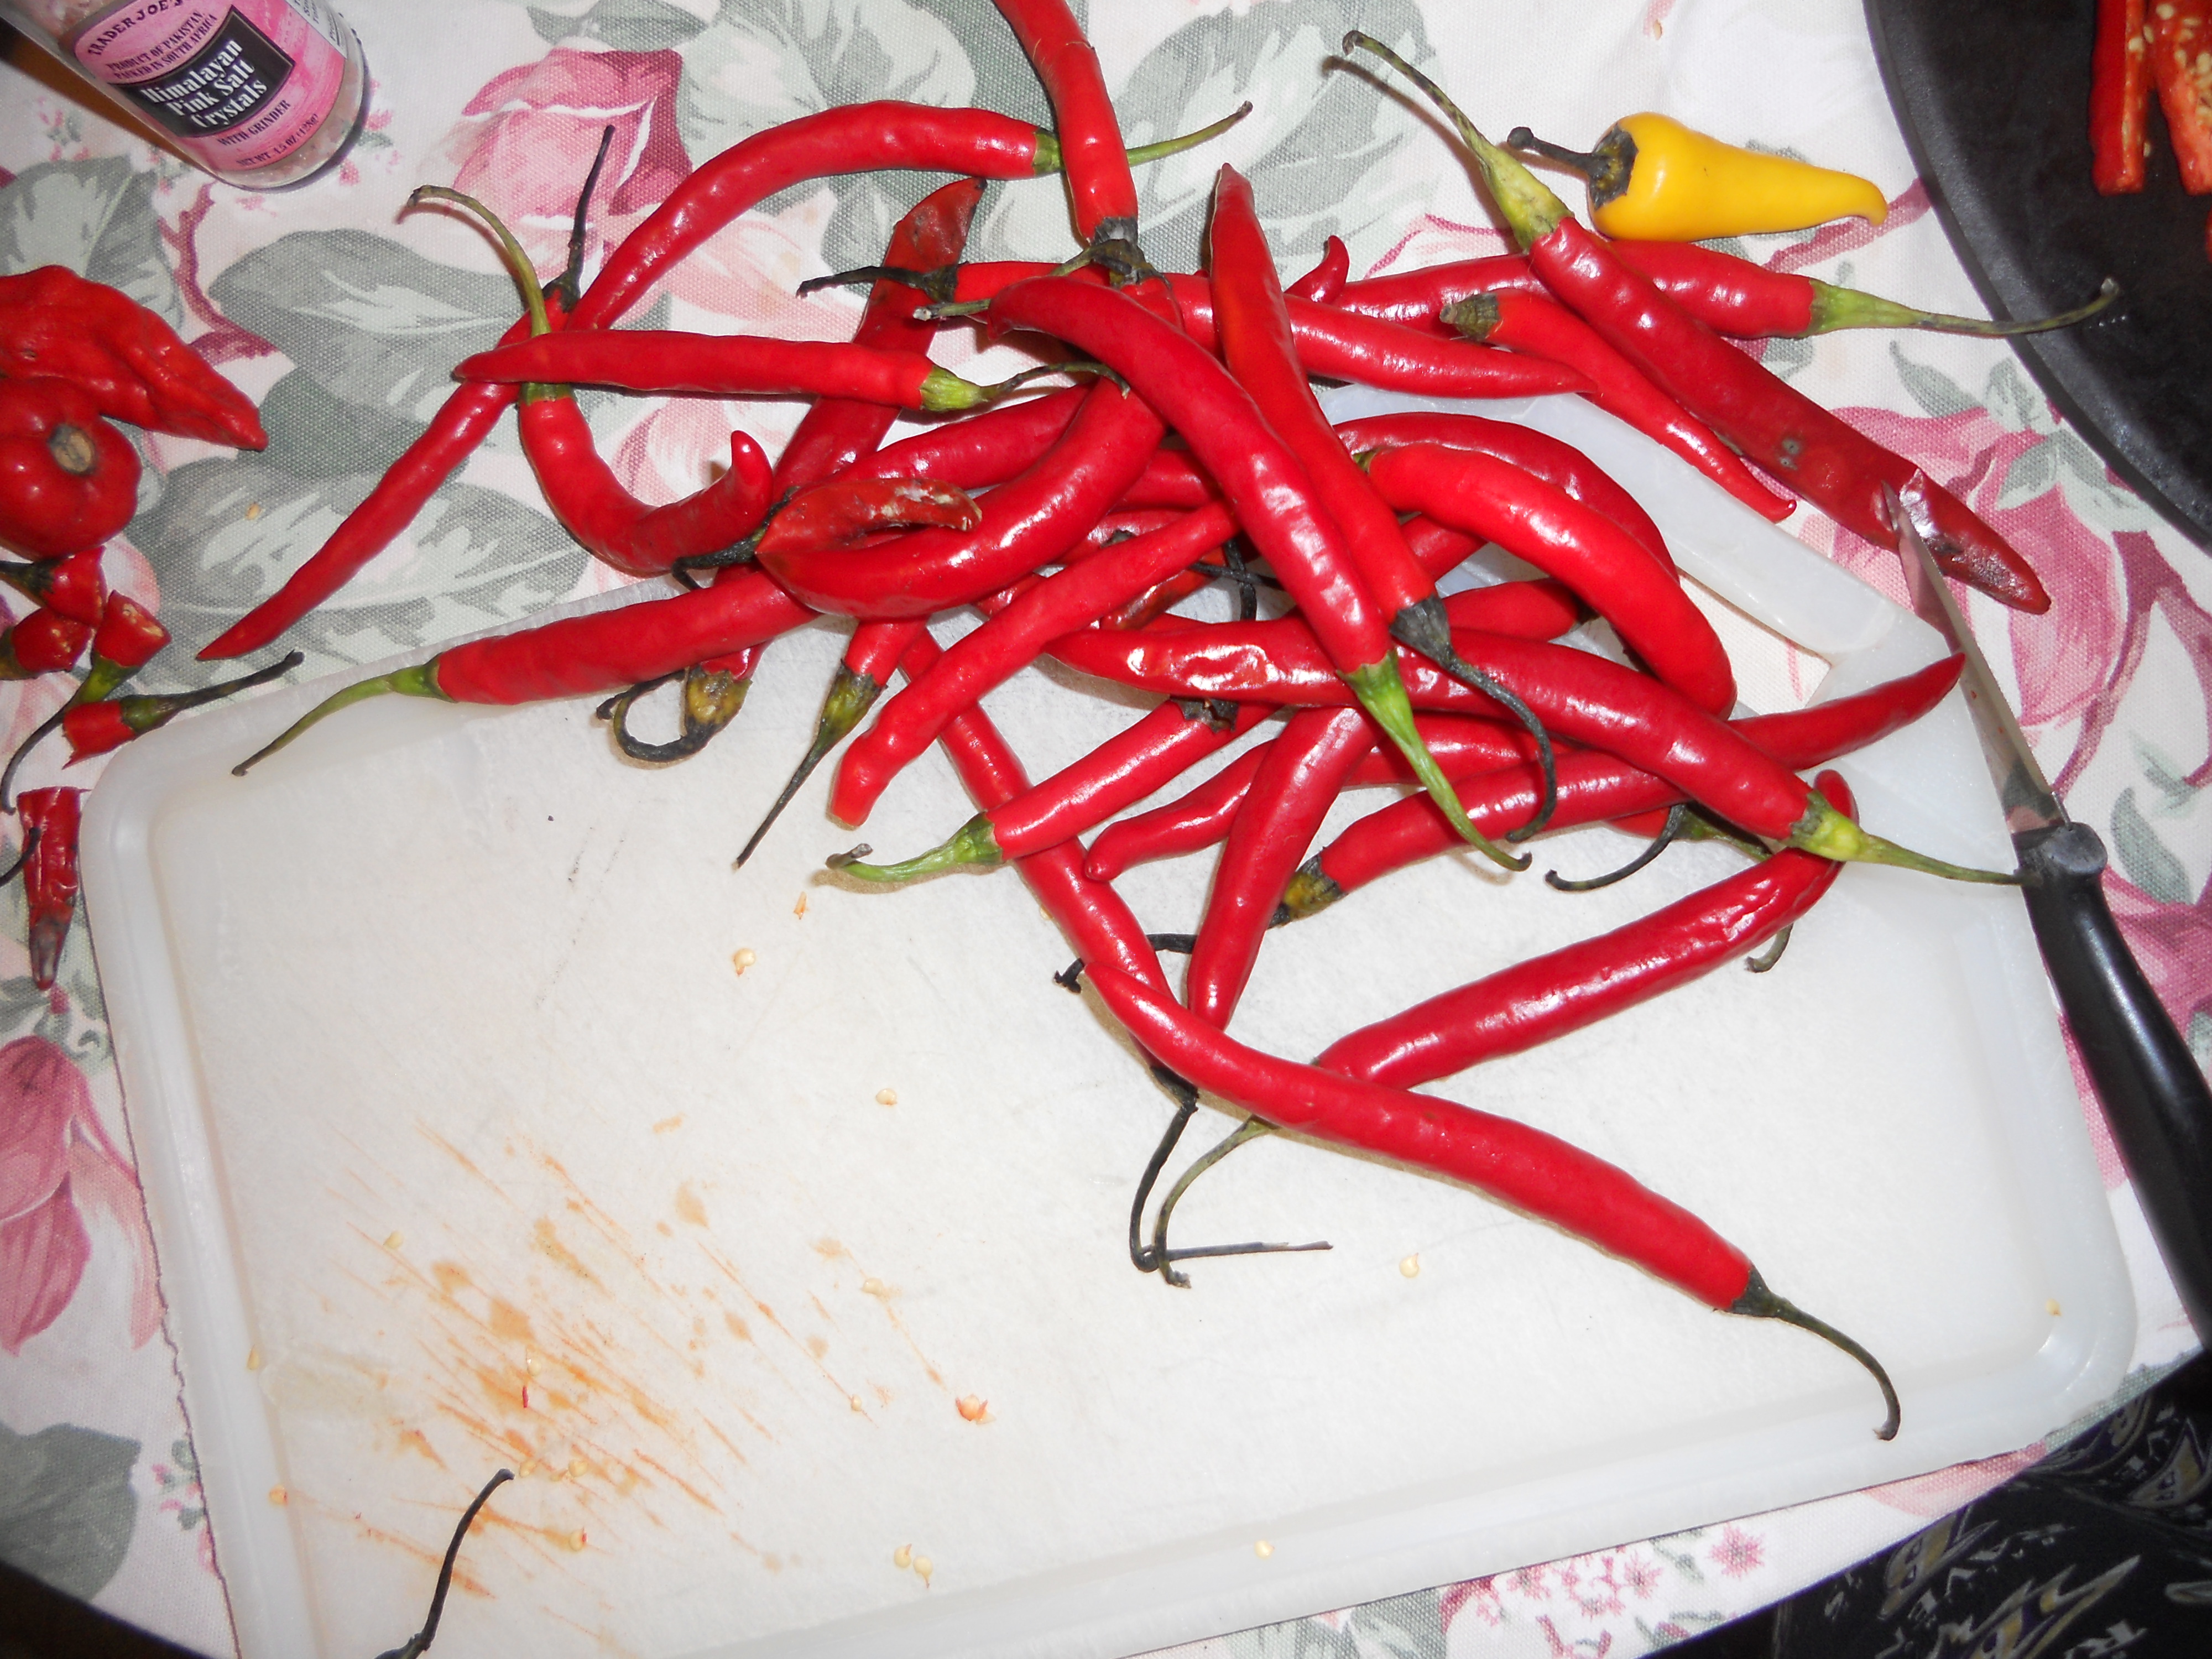
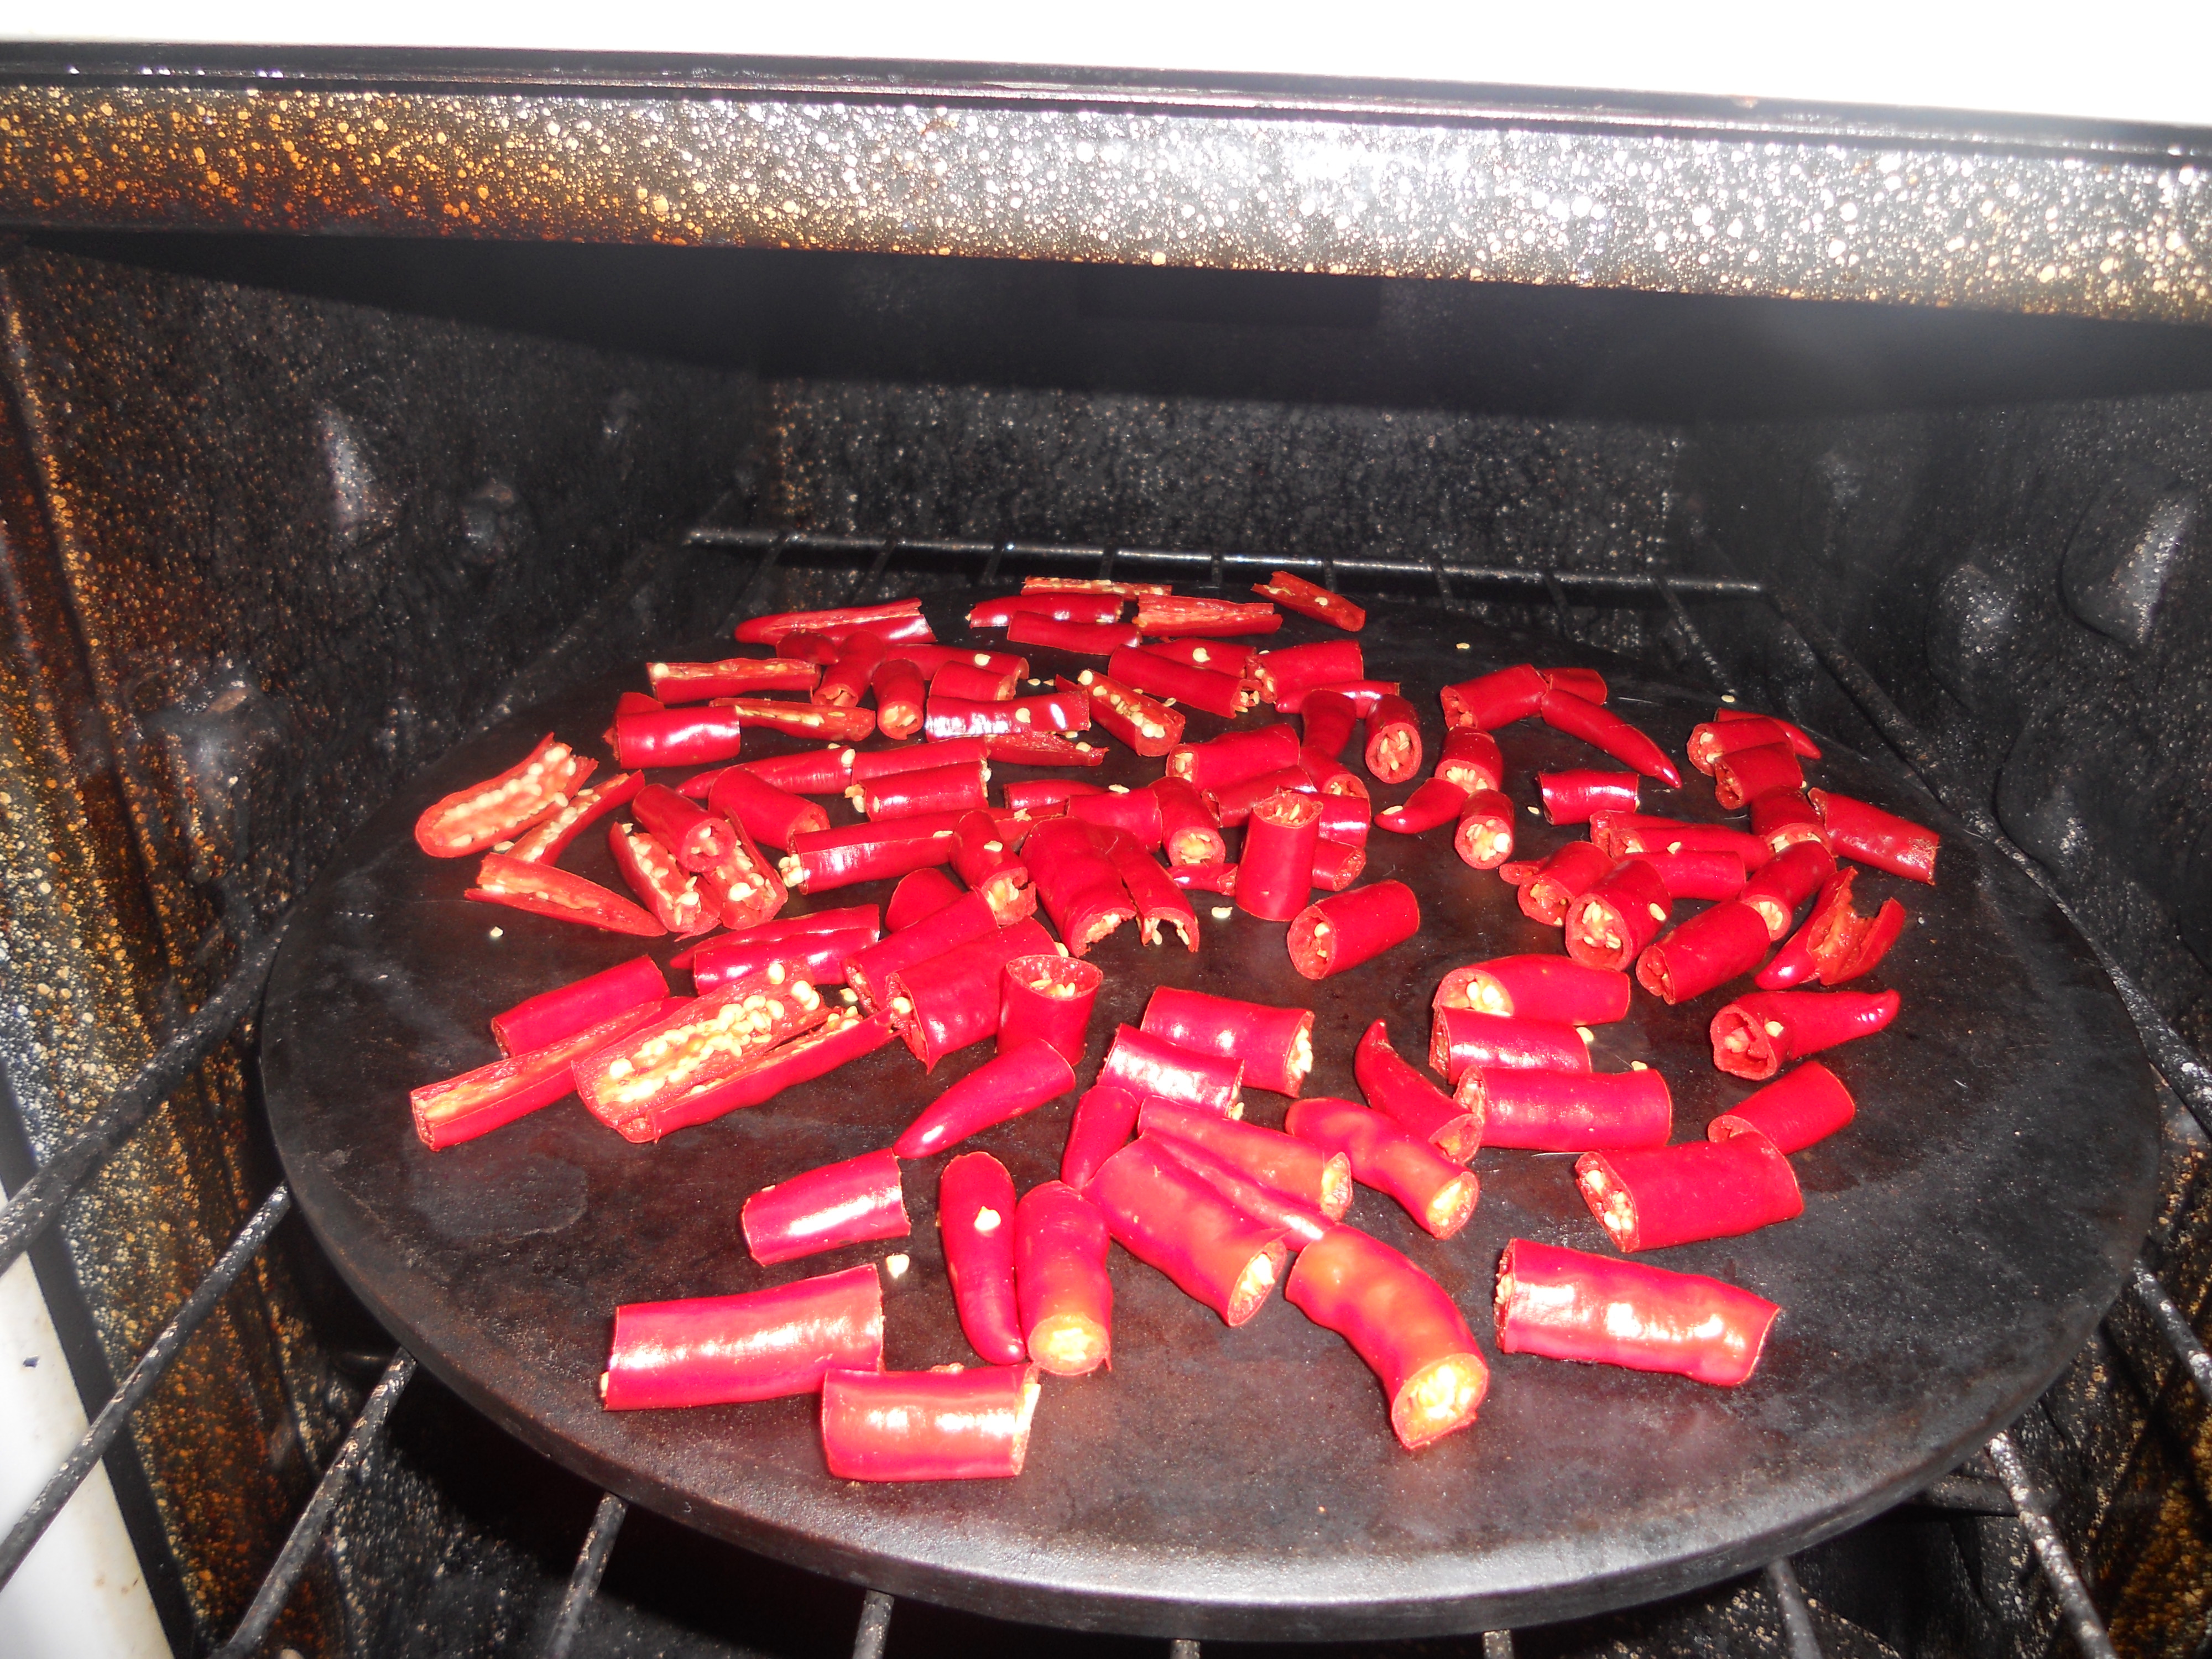
1st. Take you chilies and cut them up. You don’t need to make tiny slices just cut each in 4 pieces and throw them onto a cookie sheet or skillet.

2nd. Put your chilies in the oven for 2-3 hours on low or 200. Then all you need to do is check them regularly every hour or so.
3rd. After the chilies have reached a dark maroon color take them out and you can either crush them with you hands or in a bag or you can throw them into a blender so they are extra fine. Store in a Tupperware container or an old spice container.
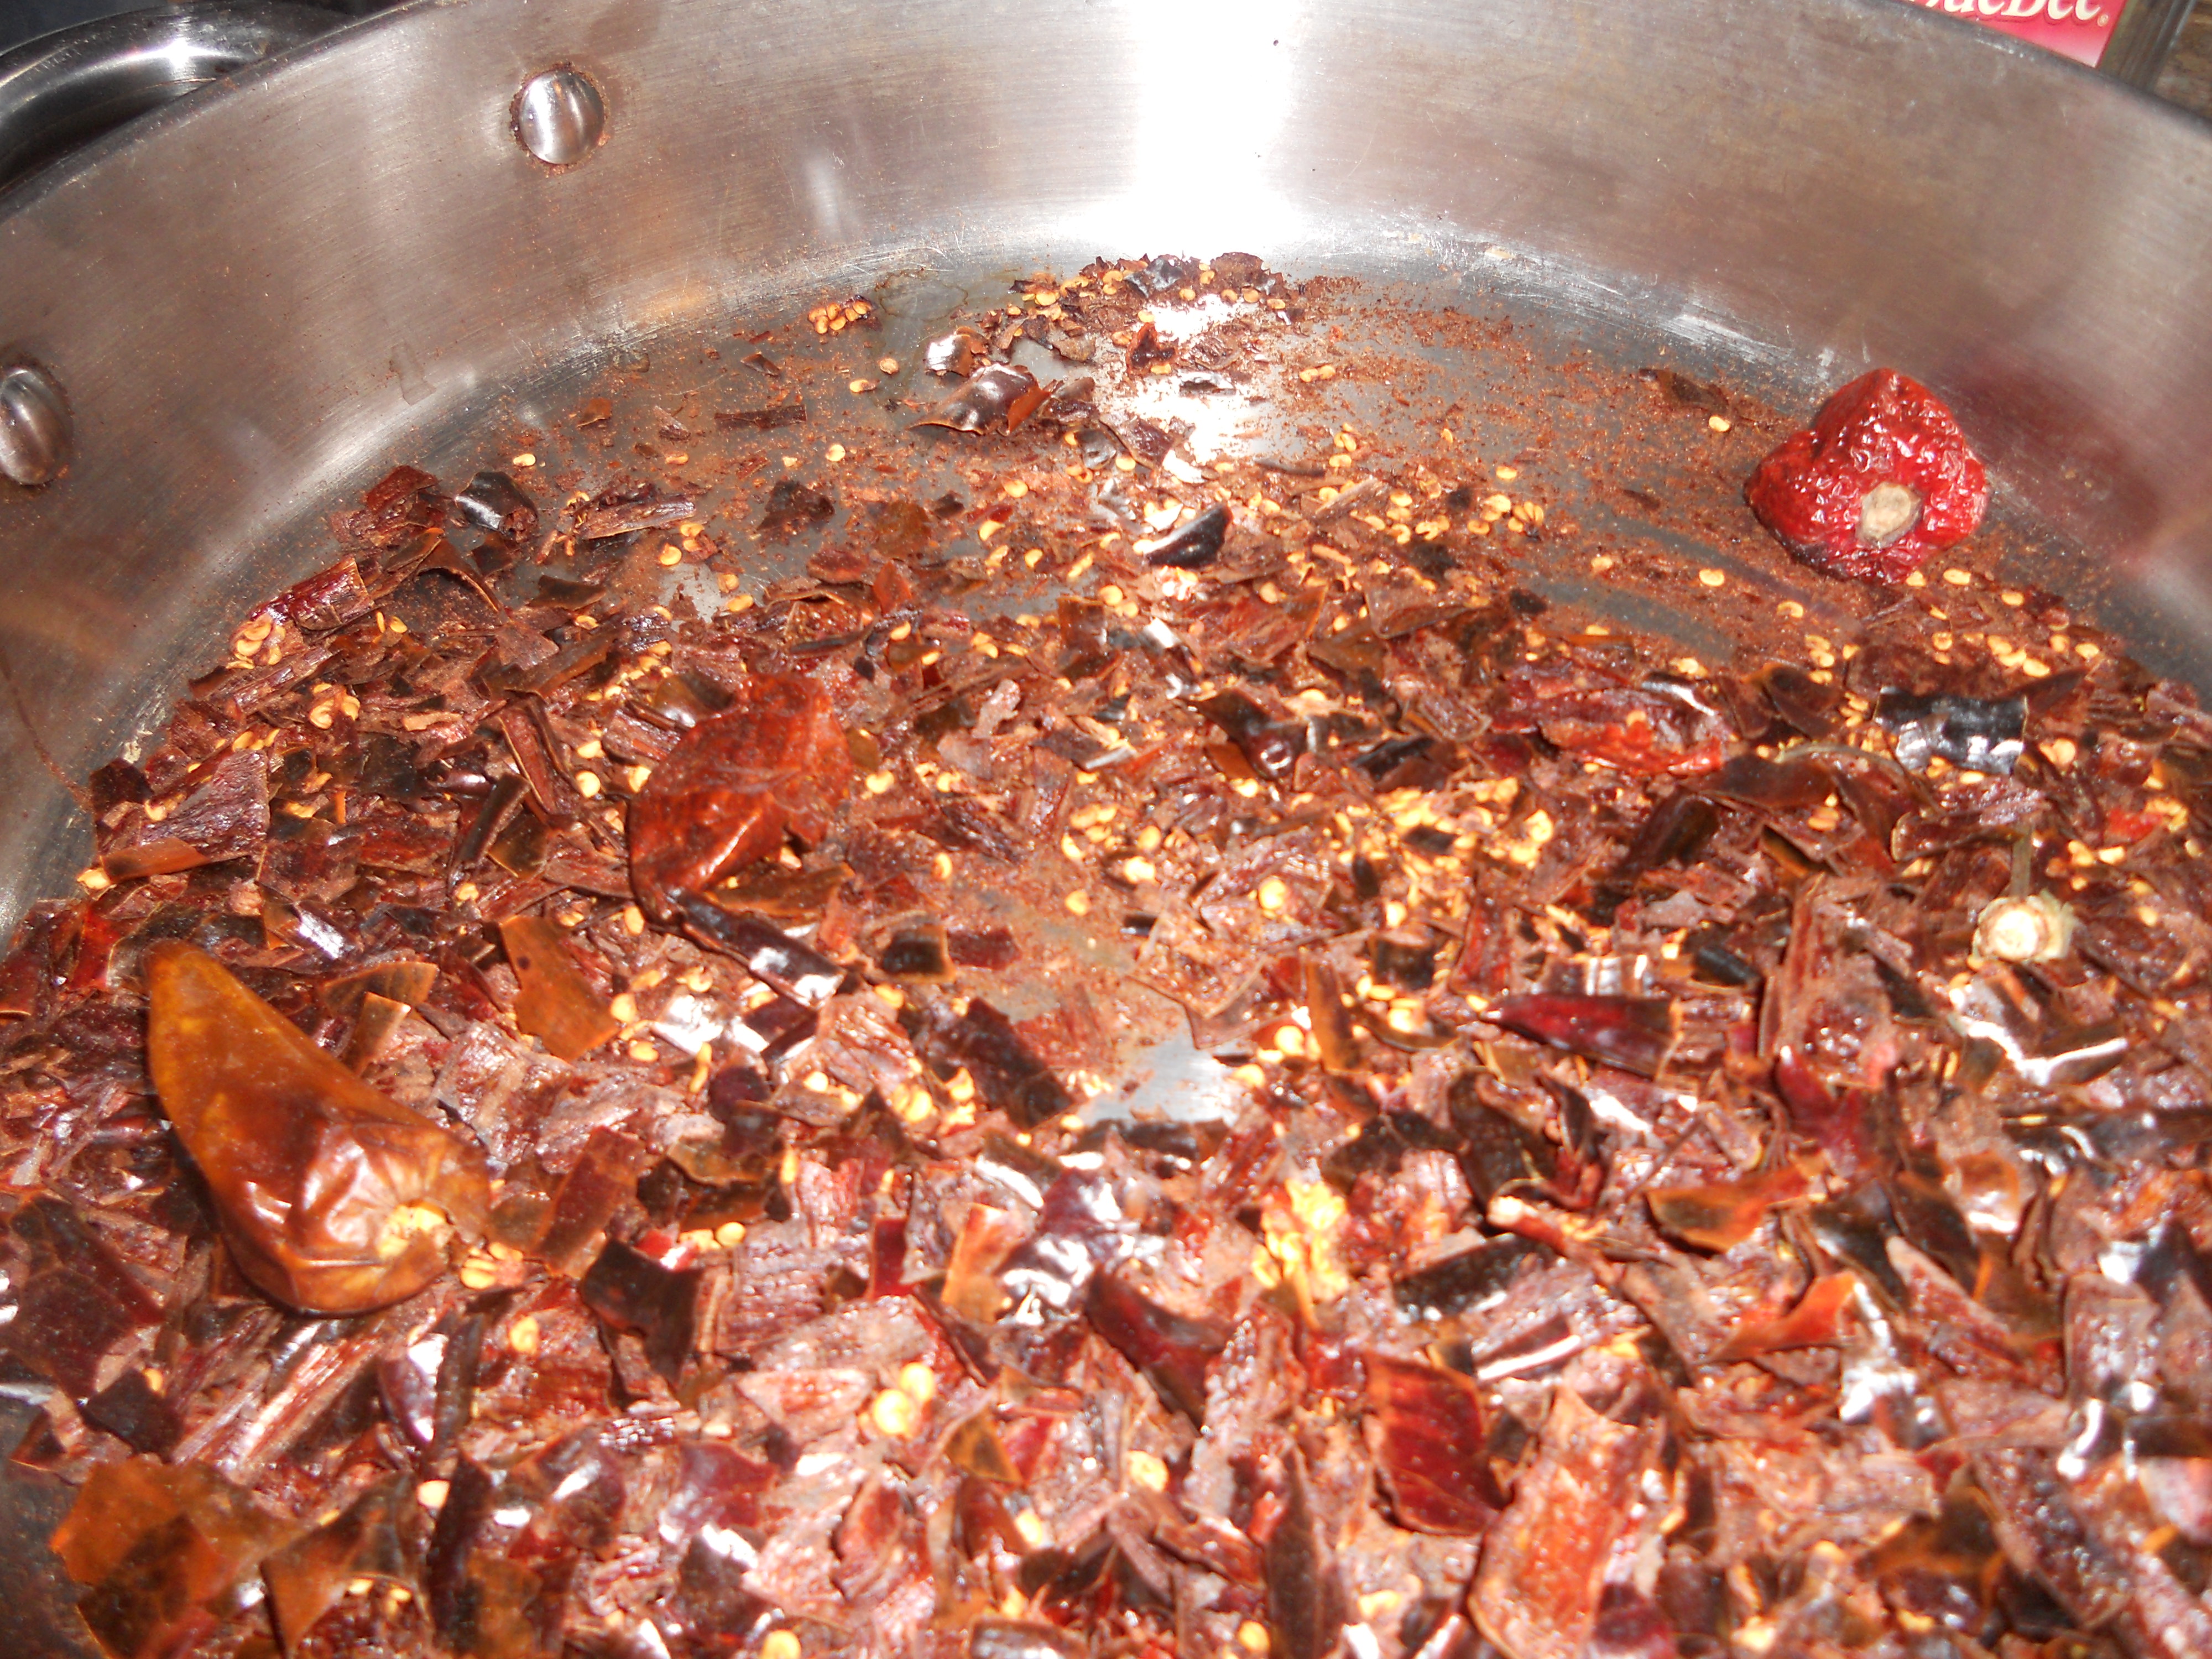
WARNING: After you blend your chilies do not smell them or anything like that. Even the powder of the chilies is very spicy and if you breath in after blending your entire nose and mouth will be on fire.
After you make your chili flakes you can use them in just about EVERY recipe if you want that extra kick. I recommend using them in a spaghetti pasta. chili.
My fellow WordPress blogger Ashley Marie from the blog No Thyme to Waste made these chili flake and fennel crackers that would be a perfect recipe to use with your chili flakes. Its the perfect homemade snack to have with crackers when you have company over.
Pumpkin Puree
So its that time of year again! When the leaves change and everything, and I mean everything, is offered pumpkin flavored. Pumpkin spiced latte, pumpkin chocolate chip pancakes, pumpkin pie, pumpkin scones, pumpkin muffins, pumpkin ravioli. You can make asmany recipes with pumpkin as Bubba can make with shrimp. This recipe is great if you have a pumpkin lying around the house that you just didn’t get the time to carve up for halloween and don’t want it to go to waste.
The pumpkin chocolate chip pancakes are especially delicious! As well as creative.
Since you can make so many things with pumpkin then I think we should start with the basics (like you didn’t already know I’d go there). But you just can’t take a pumpkin and throw it into your recipes, can you? Before you can make anything pumpkin you need to take that big gourd, give it a little TLC and turn it into pumpkin puree! After you make the pumpkin puree you can make your lattes, scones and cupcakes to your hearts content. Now making pumpkin puree is a little time consuming, not gonna lie! But if your on my site then you know thats we’re all about, healthy food and not taking the easy way out. So lets make some pumpkin puree!

1st – Take your pumpkin and cut it into pieces, leave out the stem (top and bottom). The size dosen’t matter but I just prefer to do big pieces since I don’t want to waste my time cutting my pumpkin into tiny pieces.
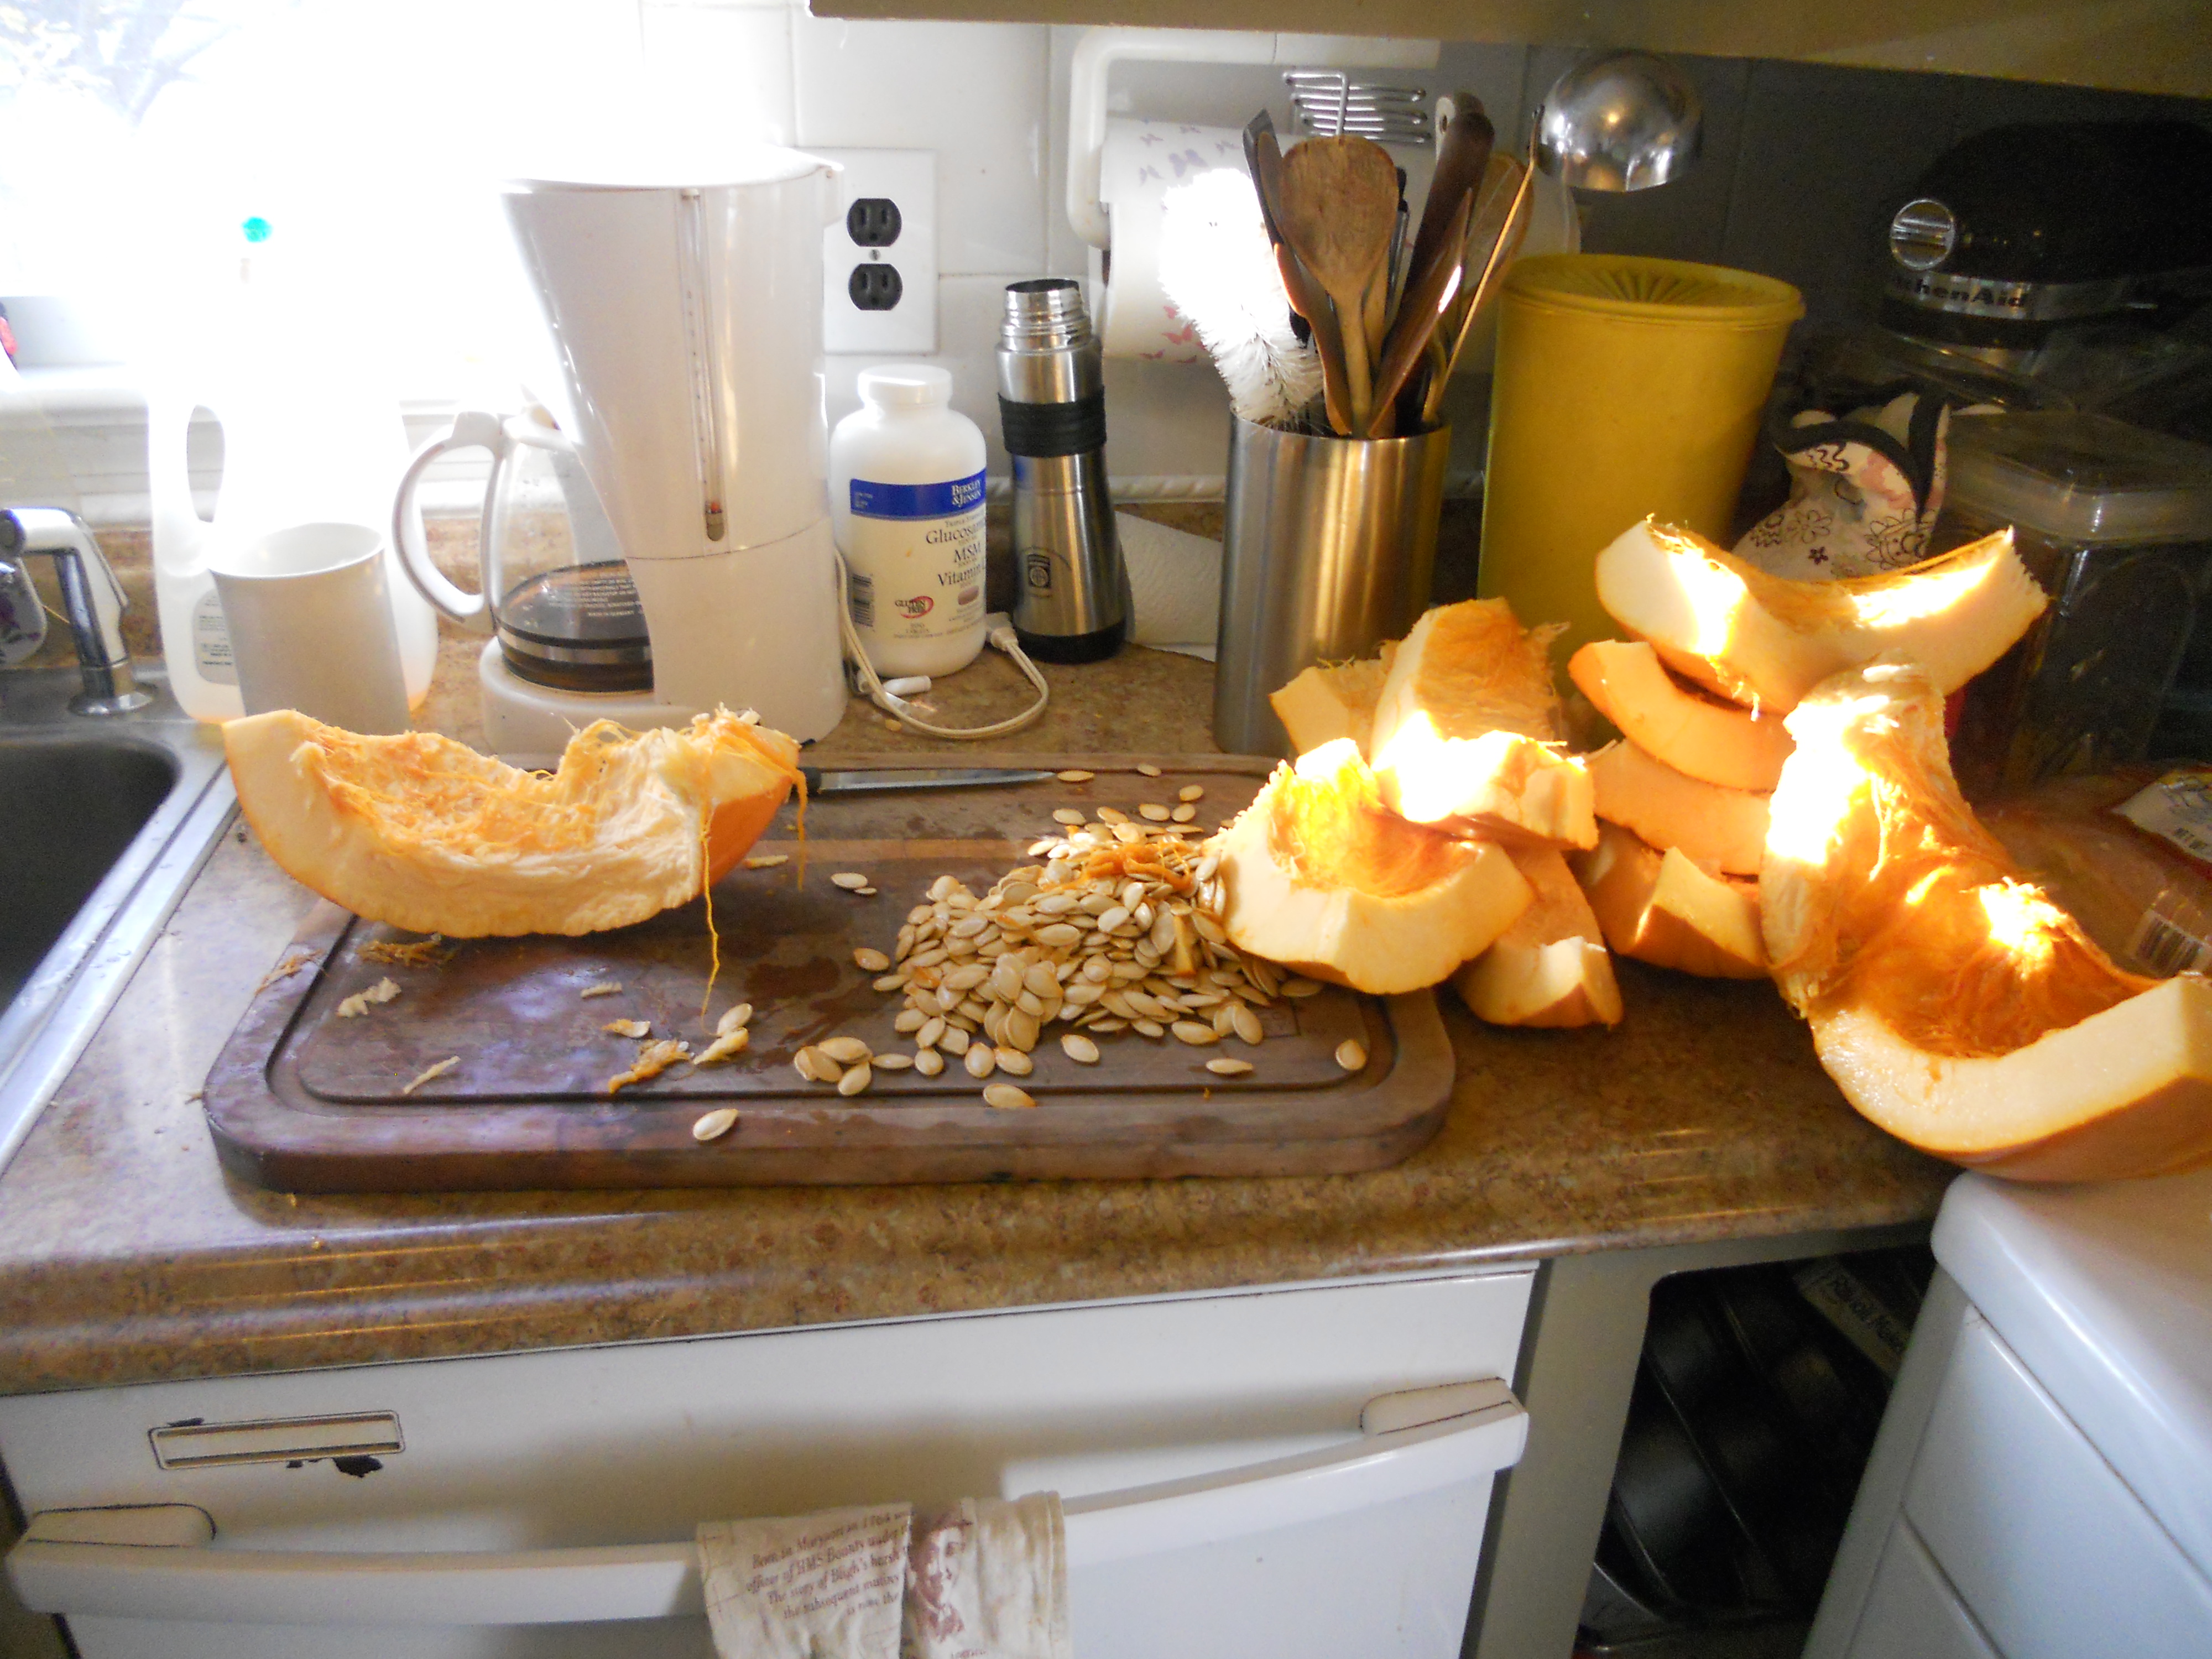 2nd- Throw your cut up pieces into a pot of boiling water, make sure they are covered as much as possible.
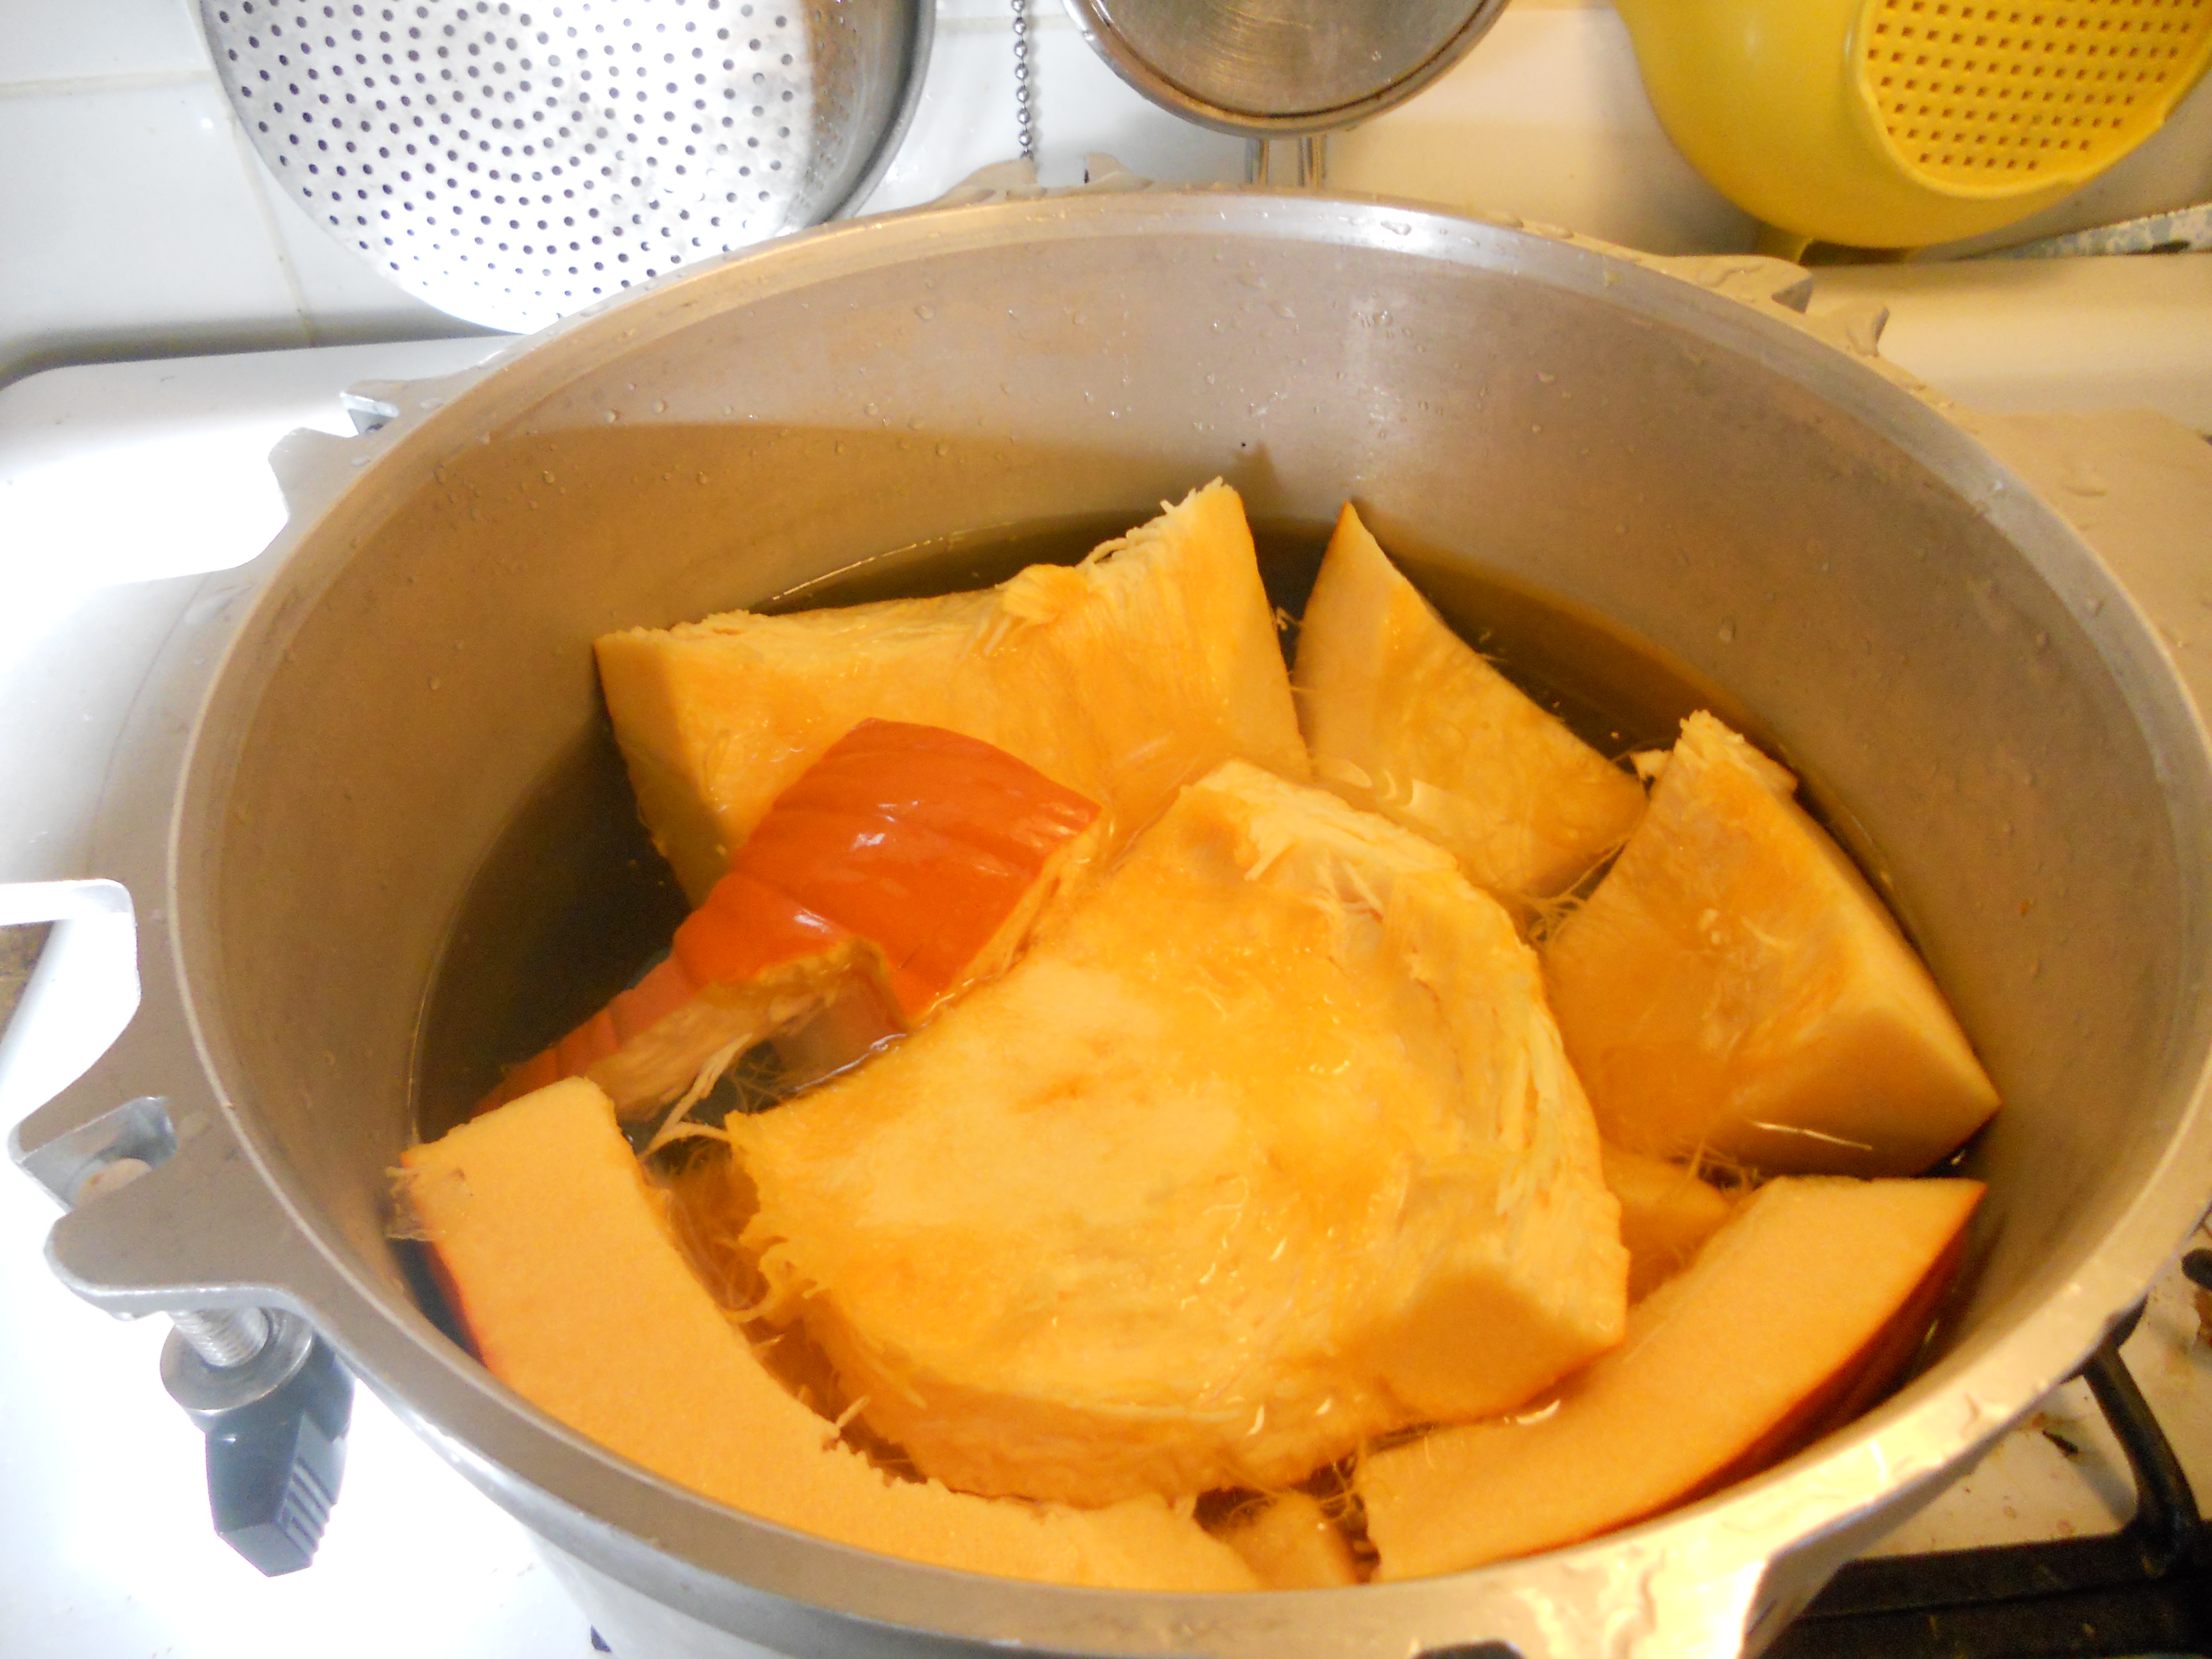
3rd- Leave your pumpkin in there for as long as it takes to pierce a knife all the way through through the meat of the pumpkin (not the skin). This should be about 20 minutes maximum. Since were pureeing the pumpkin exact cooking time isn’t too important.
4th- Once your pumpkin is done then cut the skin off from the “meat” of the pumpkin. Depending on the pumpkin the skin could just peal off but if you’re using traditional Halloween pumpkin you will need to cut the skin off.

5th- Throw your cut up pumpkin back into the pot. Then take a blender wand and blend the pumpkin up until it is a very watery puree. If you don’t have a blender wand your blender is fine too. 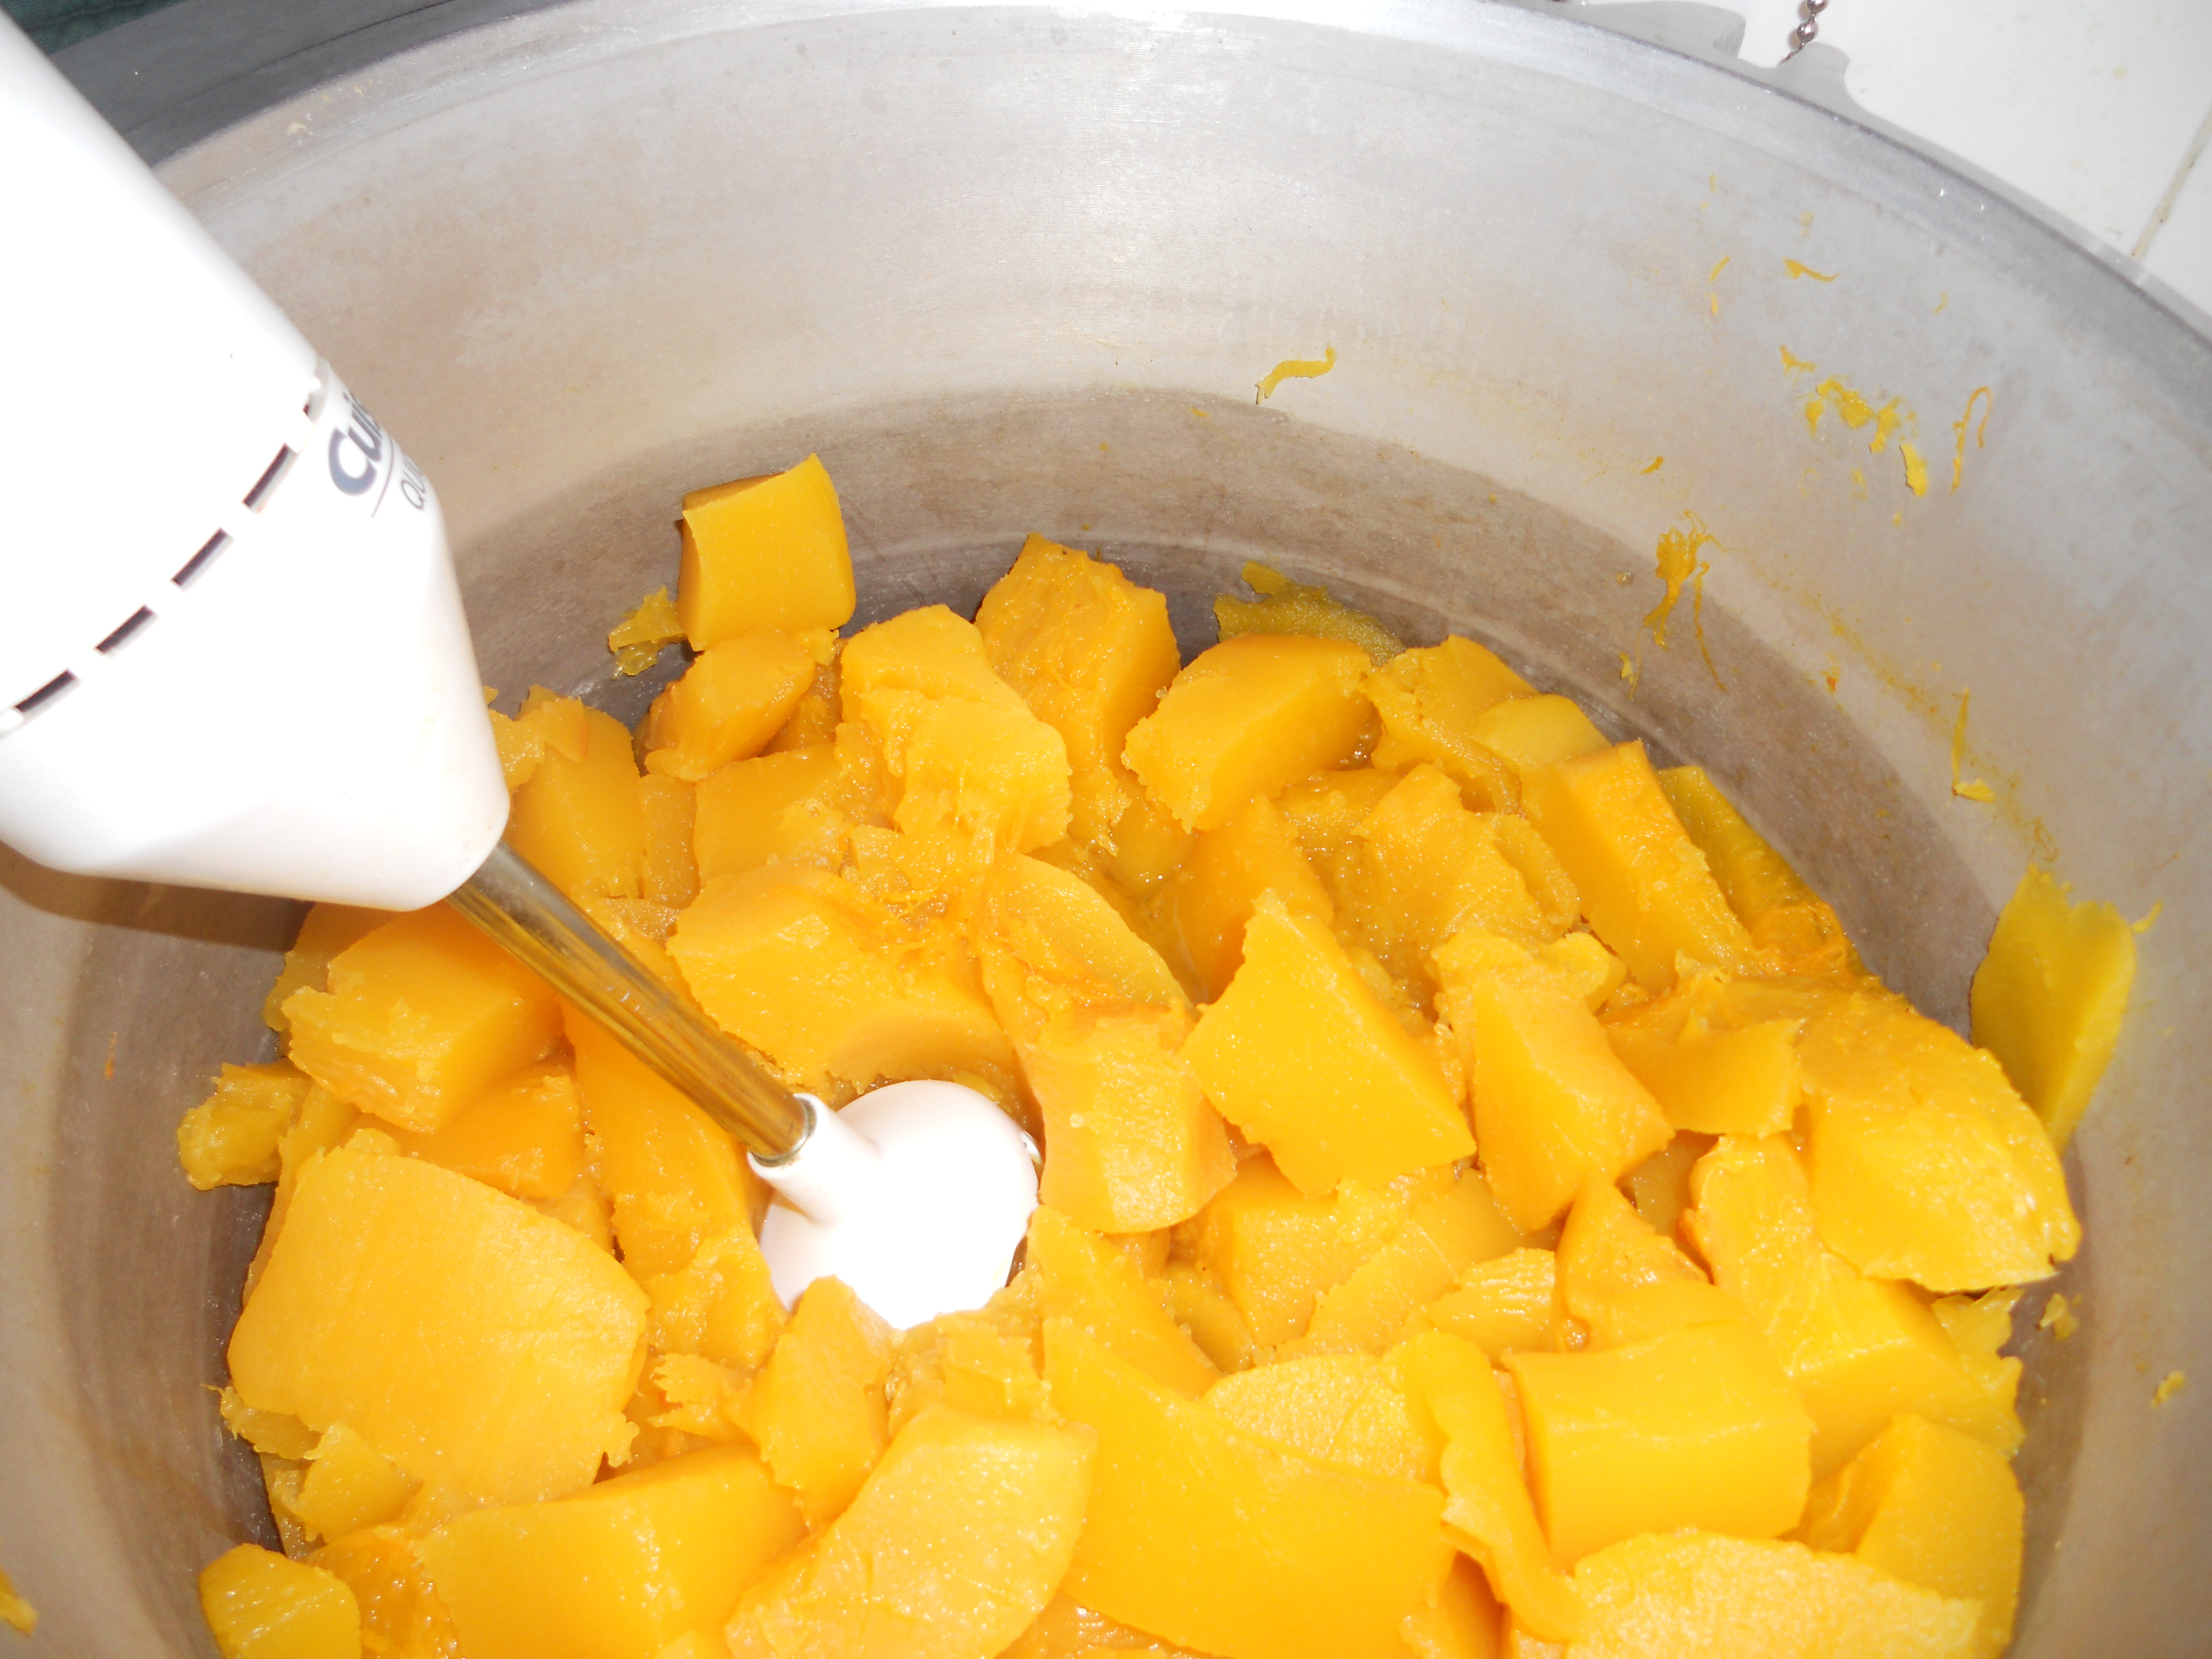
6th- Let your puree simmer on low for 25 minutes or to the desired consistency. You must stir it every 5 minutes or so so the pumpkin dosent burn. The reason why you simmer your puree is to get rid of the unneeded water that could dilute that pumpkiney goodness taste.
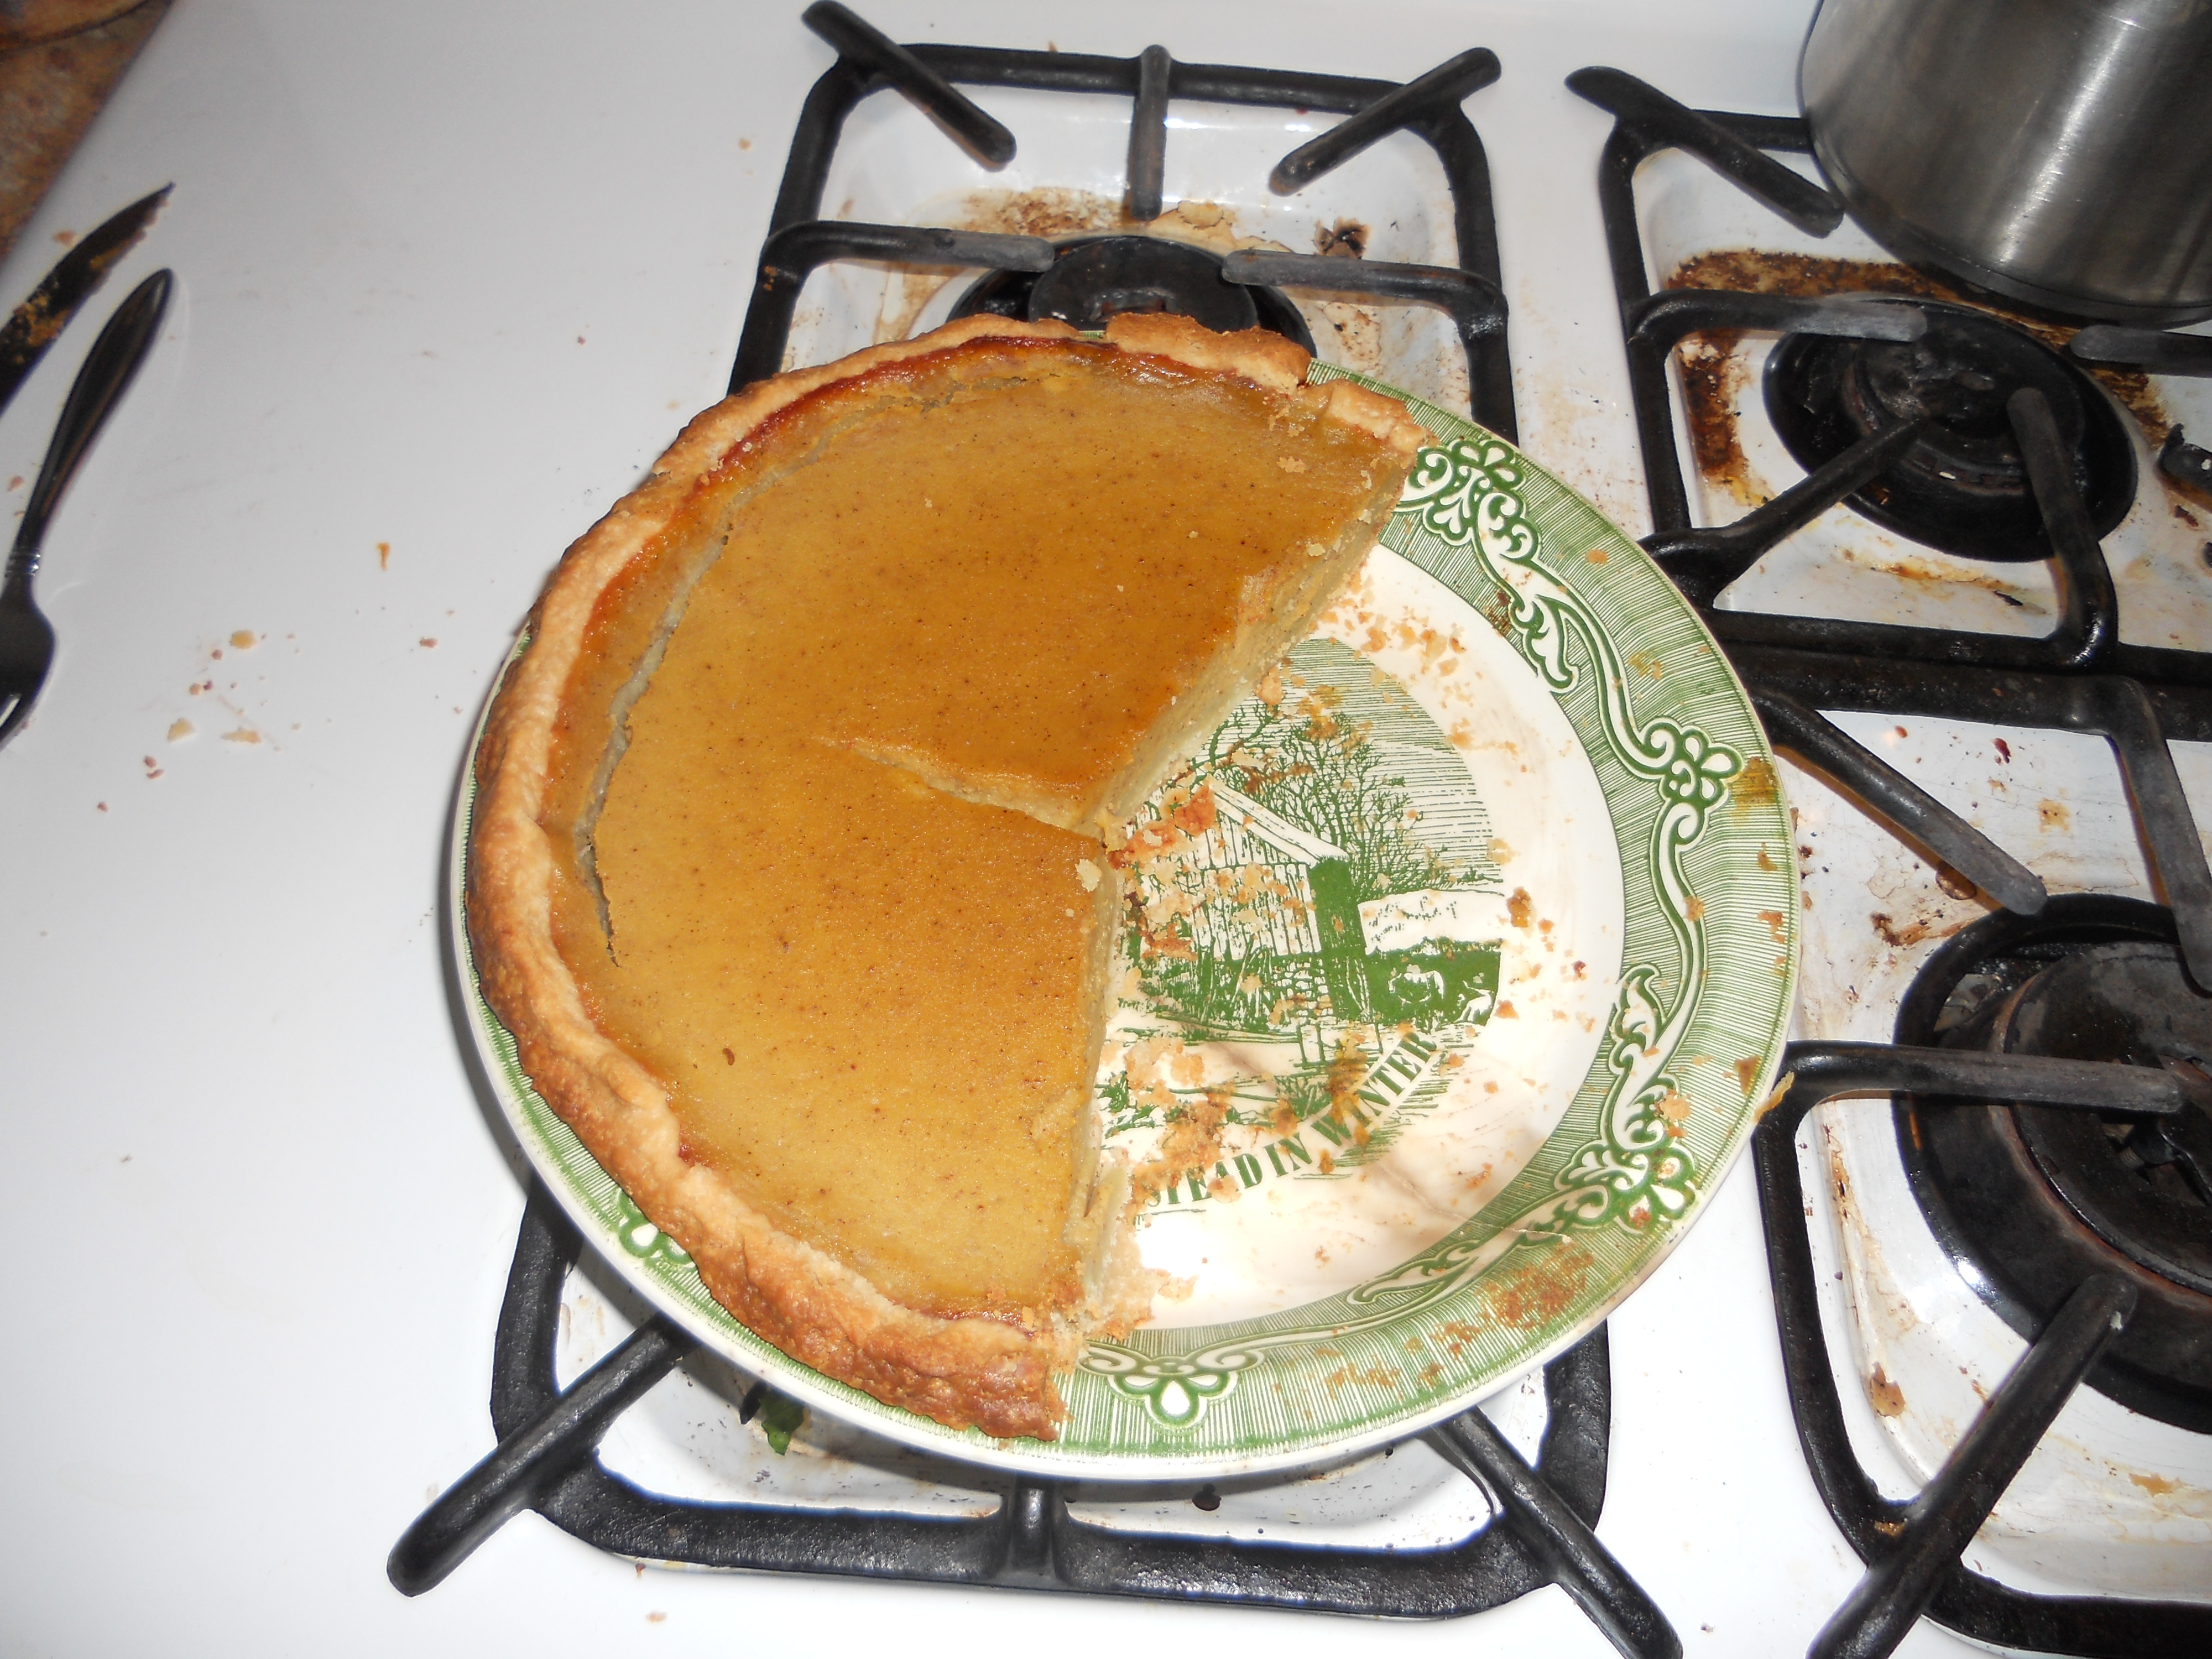
7th- Once your puree is the desired consistency then you can either put it on a bowl with a lid and let it sit in the fridge, can it for later or you can follow my easy recipe for a pumpkin pie! (coming soon!) words 496
Pumpkin Puree
So its that time of year again! When the leaves change and everything, and I mean everything, is offered pumpkin flavored. Pumpkin spiced latte, pumpkin chocolate chip pancakes, pumpkin pie, pumpkin scones, pumpkin muffins, pumpkin ravioli. You can make asmany recipes with pumpkin as Bubba can make with shrimp. This recipe is great if you have a pumpkin lying around the house that you just didn’t get the time to carve up for halloween and don’t want it to go to waste.
The pumpkin chocolate chip pancakes are especially delicious! As well as creative.
Since you can make so many things with pumpkin then I think we should start with the basics (like you didn’t already know I’d go there). But you just can’t take a pumpkin and throw it into your recipes, can you? Before you can make anything pumpkin you need to take that big gourd, give it a little TLC and turn it into pumpkin puree! After you make the pumpkin puree you can make your lattes, scones and cupcakes to your hearts content. Now making pumpkin puree is a little time consuming, not gonna lie! But if your on my site then you know thats we’re all about, healthy food and not taking the easy way out. So lets make some pumpkin puree!
1st – Take your pumpkin and cut it into pieces, leave out the stem (top and bottom). The size dosen’t matter but I just prefer to do big pieces since I don’t want to waste my time cutting my pumpkin into tiny pieces.
2nd- Throw your cut up pieces into a pot of boiling water, make sure they are covered as much as possible.
3rd- Leave your pumpkin in there for as long as it takes to pierce a knife all the way through through the meat of the pumpkin (not the skin). This should be about 20 minutes maximum. Since were pureeing the pumpkin exact cooking time isn’t too important.
4th- Once your pumpkin is done then cut the skin off from the “meat” of the pumpkin. Depending on the pumpkin the skin could just peal off but if you’re using traditional Halloween pumpkin you will need to cut the skin off.
5th- Throw your cut up pumpkin back into the pot. Then take a blender wand and blend the pumpkin up until it is a very watery puree. If you don’t have a blender wand your blender is fine too.
6th- Let your puree simmer on low for 25 minutes or to the desired consistency. You must stir it every 5 minutes or so so the pumpkin dosent burn. The reason why you simmer your puree is to get rid of the unneeded water that could dilute that pumpkiney goodness taste.
7th- Once your puree is the desired consistency then you can either put it on a bowl with a lid and let it sit in the fridge, can it for later or you can follow my easy recipe for a pumpkin pie! (coming soon!) words 496
Pickles !
So today were going to make one of my favorite things to eat ever. Pickles!!! When I say that pickles are my favorite thing ever I really mean it. My love of pickles knows no bounds, even going as far as costing me a job. But that is another story for another time, or never. The great thing about this recipe is that you don’t need to can your pickles you just need to throw it into a jar. The pickles that I am going to show you how to make today are exactly like the Klaussen pickles that you buy in the refrigerated section of the supermarket. The other pickles are the canned ones that you find in the non-refrigerated section. The difference between these two is that the Klaussen pickles are more crisp and fresh than the canned pickles. This is because…. well… they ARE fresher. The Klaussen pickles perish much quicker and need to be refrigerated to remain their freshness and edibility since they are not caned. While they perish quicker the freshness and crispness really takes you sandwiches to the next level. This recipe is so easy that I am so surprised that many people don’t make their own pickles more often, not to mention that the amount of money you save from not buying them from the store is huge. Think about it. My ingredients probably cost me less than $3, and that’s still considering that the cucumbers I bought were $2. If you grow your own then this will literally cost you 50 cents to make. When you check out how easy my steps below are you won’t ever buy your own pickles again.
Step 1. Get all your ingredients together. You will need pickles, dill, salt, pepper corns, chopped garlic, vinegar and filtered water.

Step 2. Cut your pickles into the desired shape that you want for you pickles. Since I like to put my pickles on sandwiches I’ve chosen thin slices.

Step 3. Find a jar or tupperware container. Whatever you choose your jar make sure it has a lid that can seal it tightly.
Step 4. Throw all your ingredients, except the water, into the jar. 
Step 5. Fill the jar to the top with your filtered water. Cover with the lid. 
Step 6. Shake your jar up and let it sit on your counter for 12 hours. After 12 hours turn it upside down and let it sit for another 12 hours before putting it in the refrigerator. 
You have a month to eat them before they go bad, but if you love pickles like I do they will be gone long before that!
Also if you want to can these pickles to last longer through the winter you can check out this caning blog!
470 words

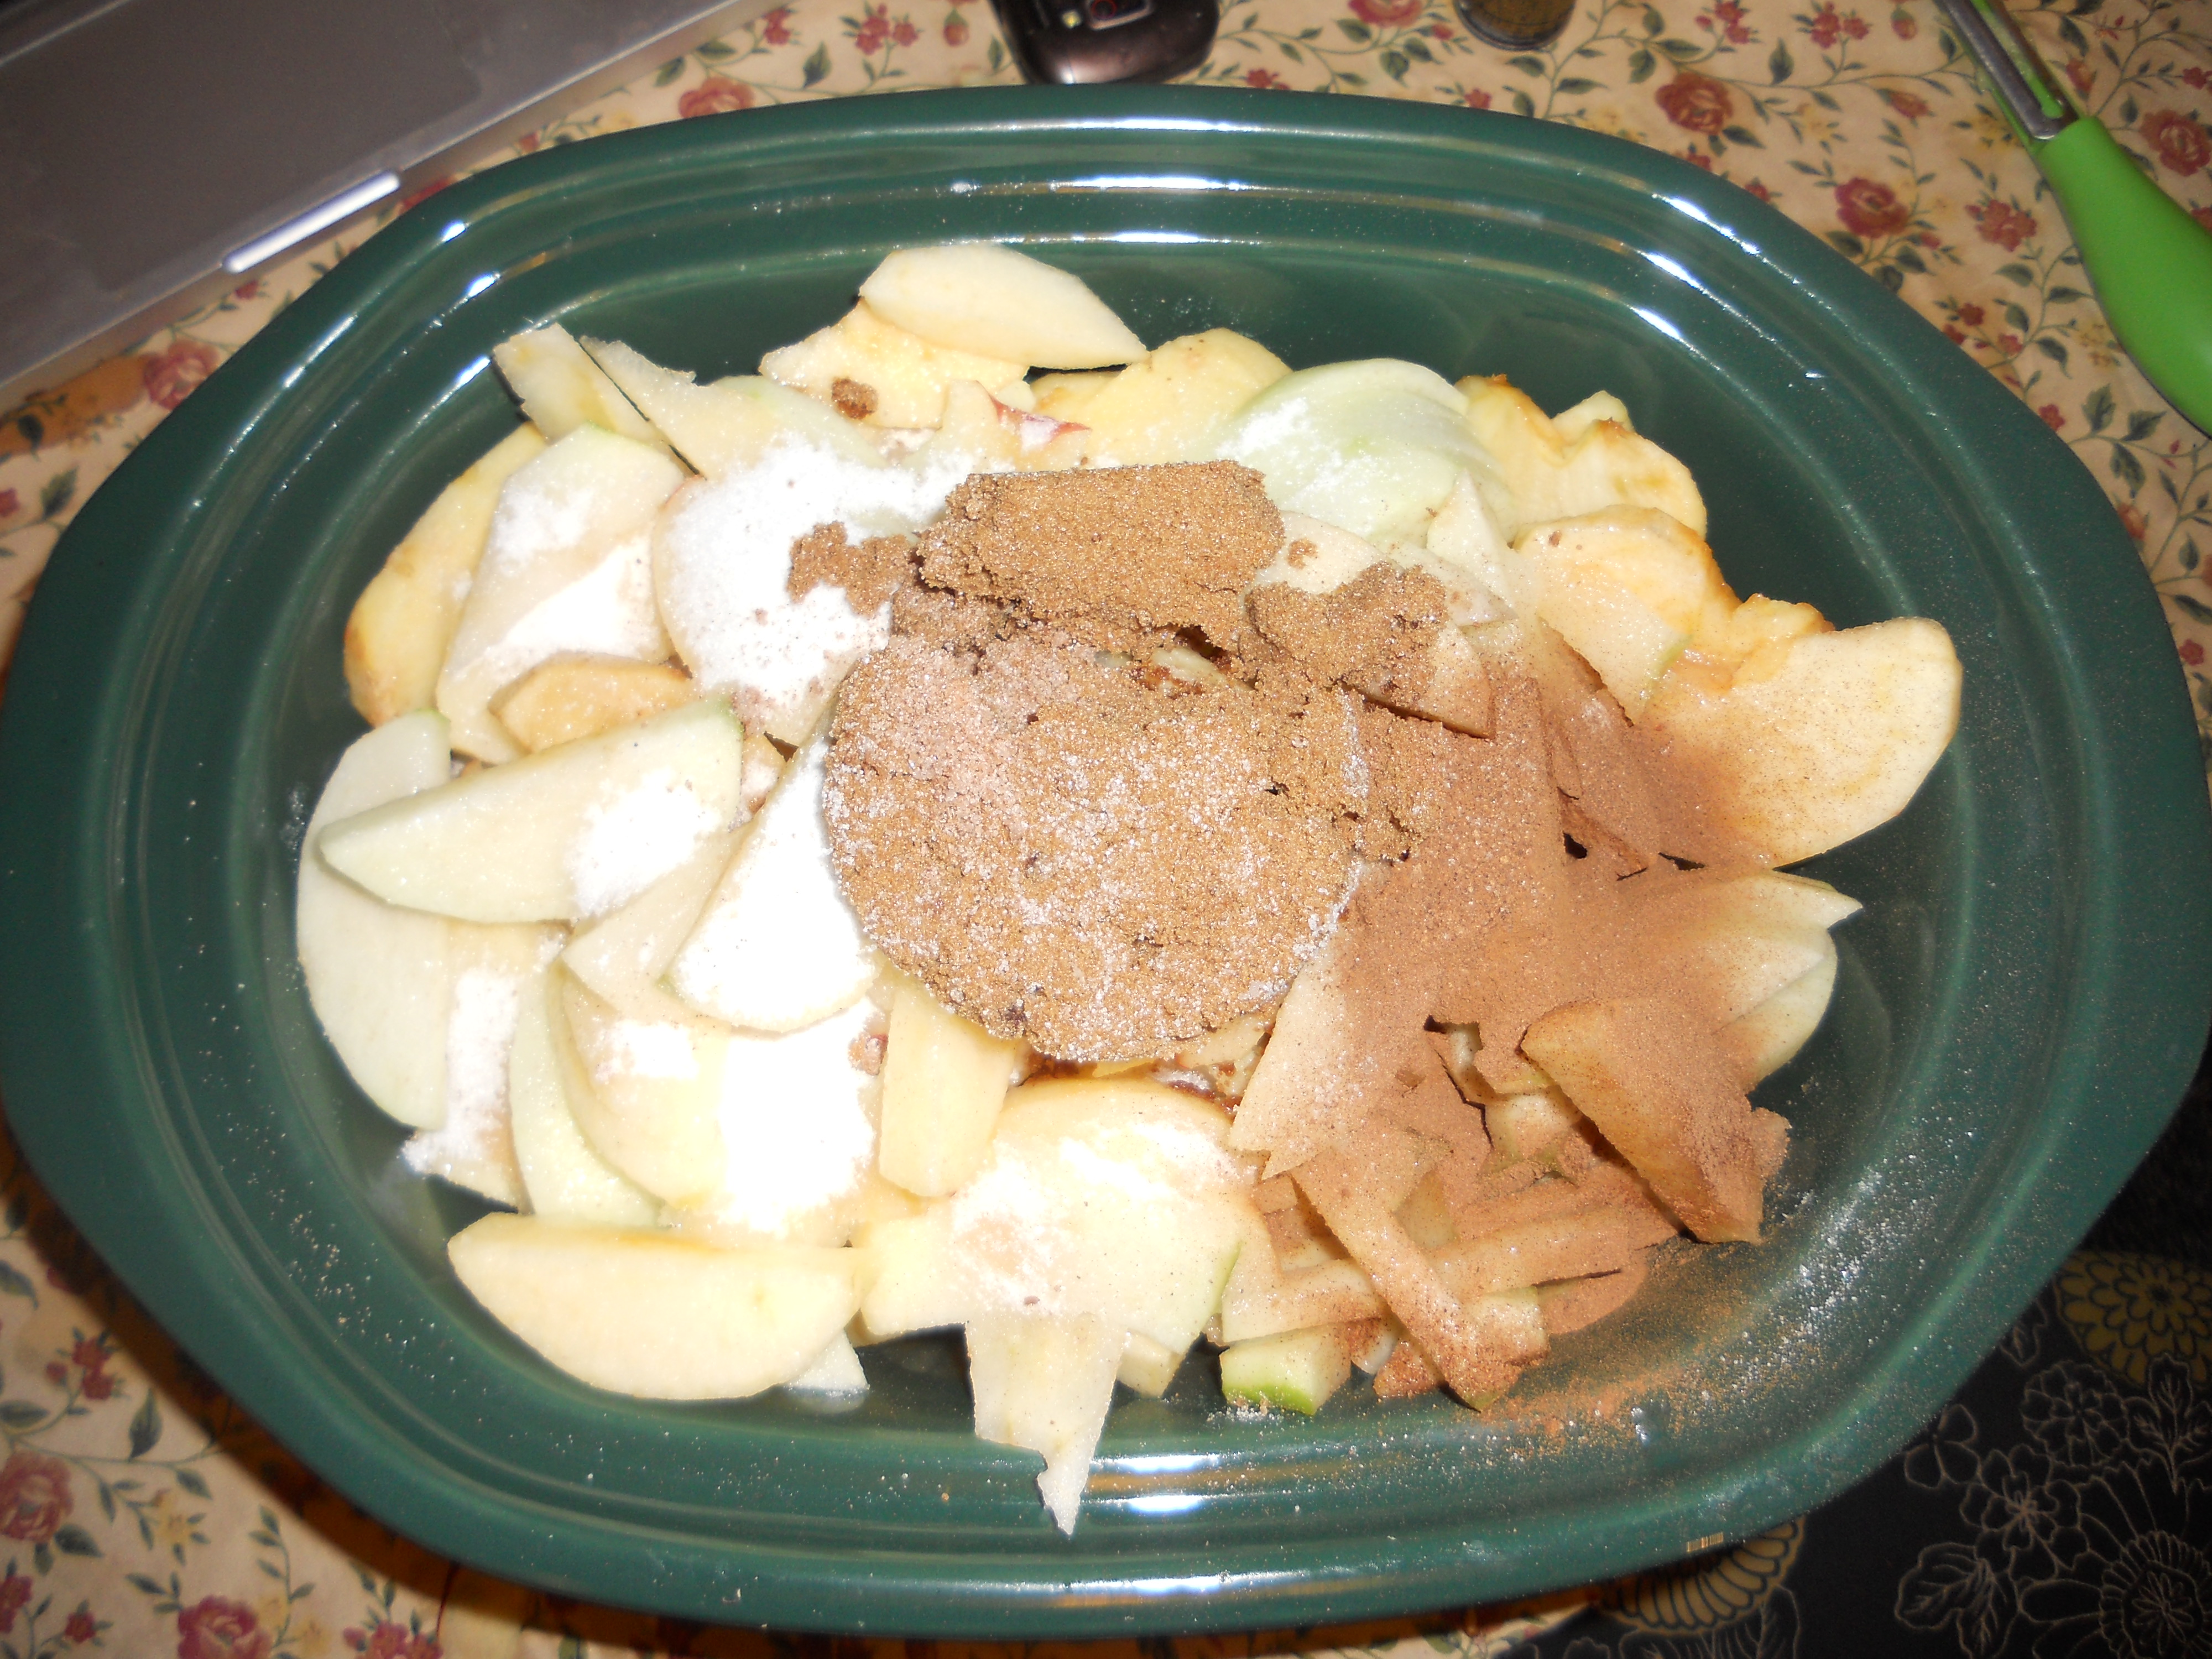
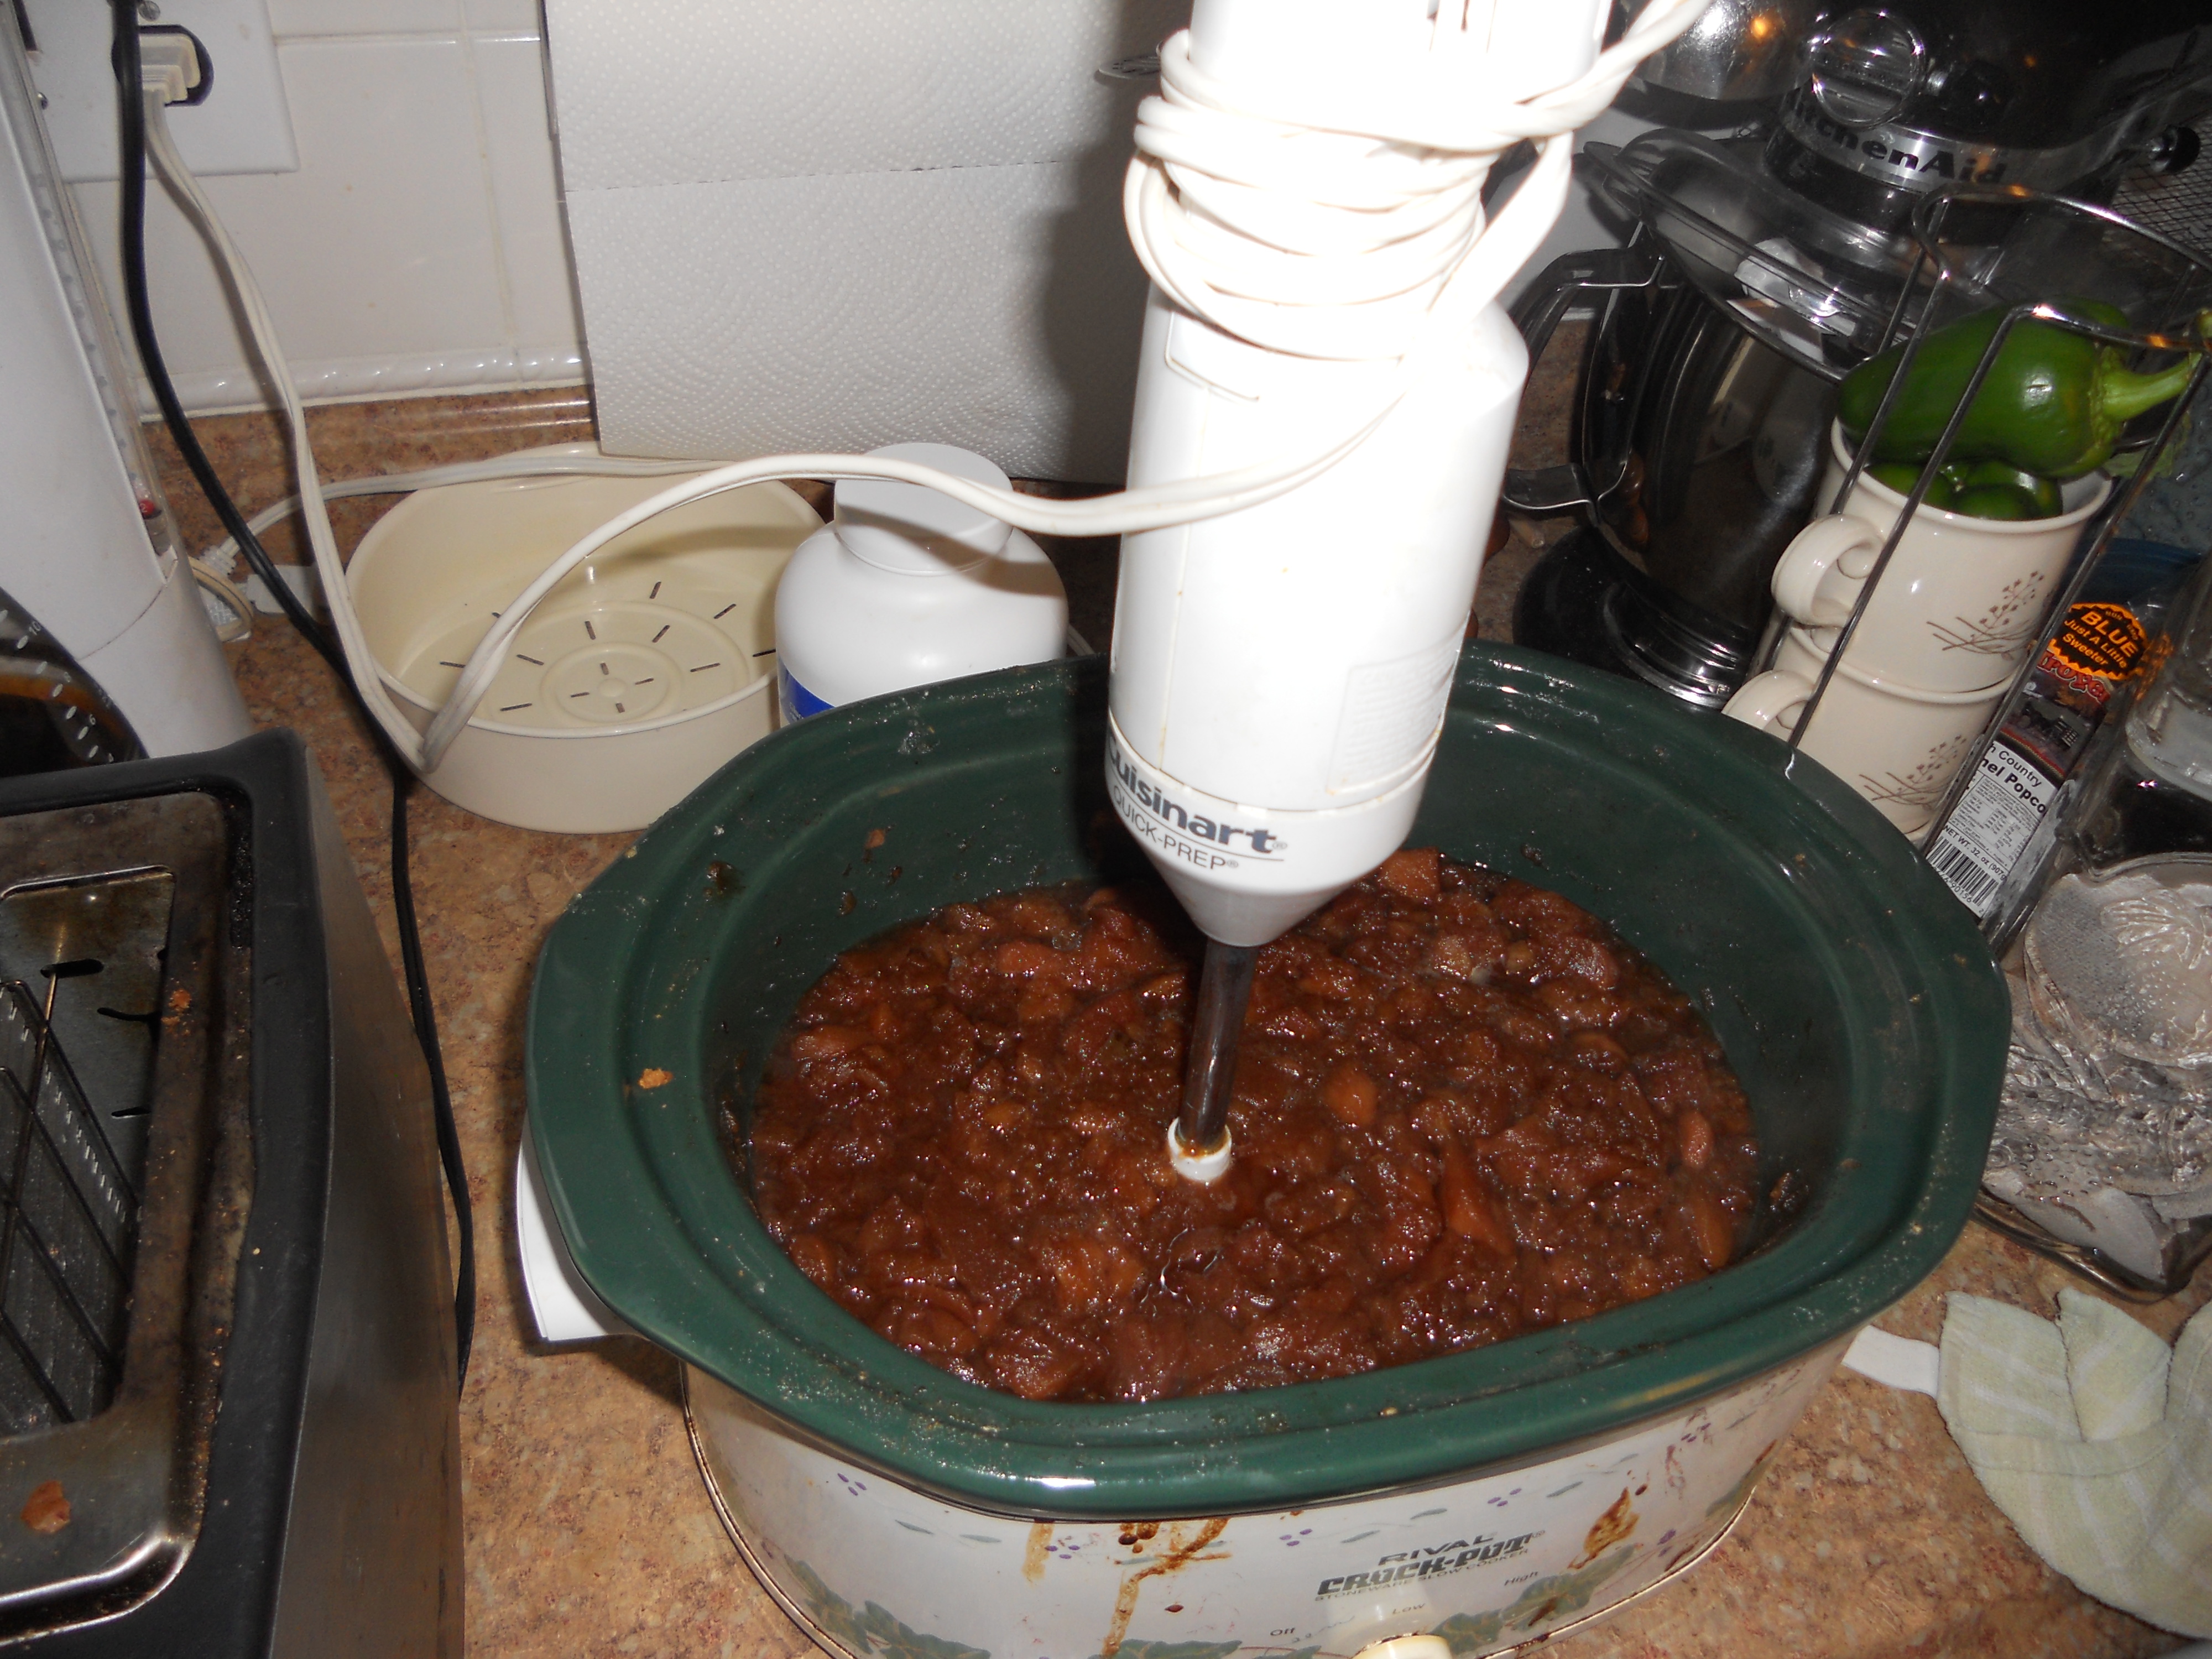
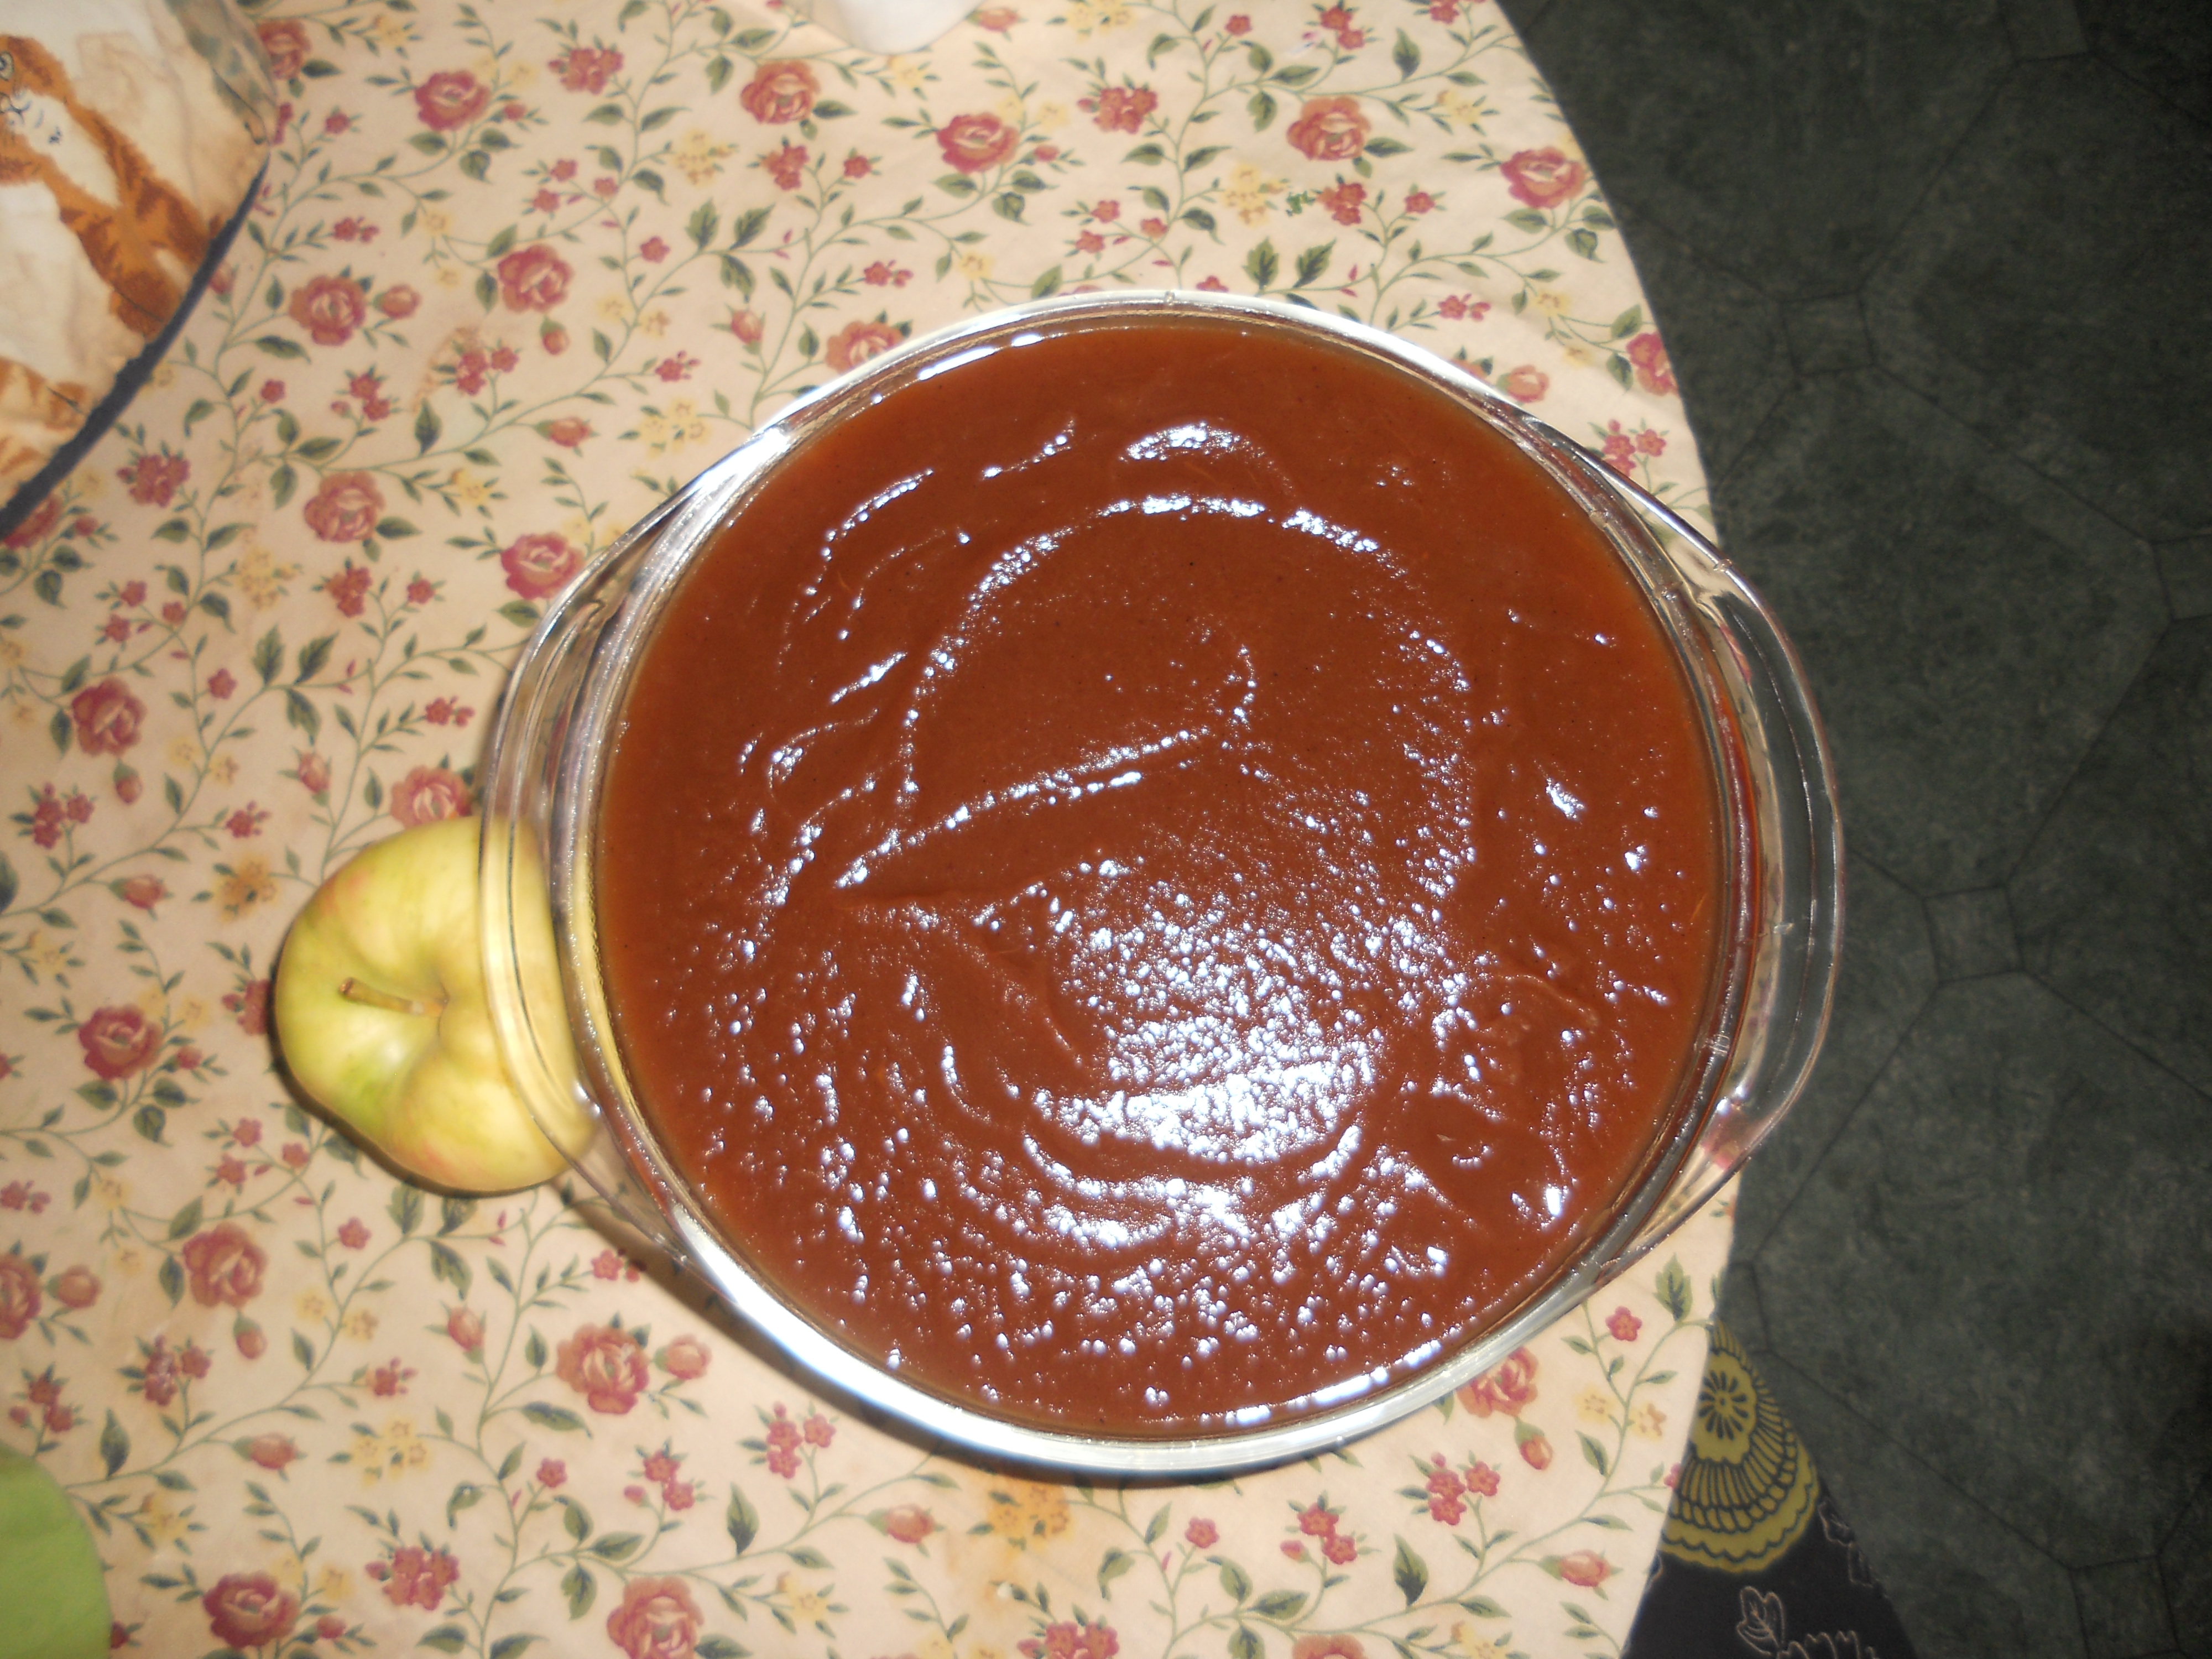
Homemade Apple Butter
Ok! So you have your apples and now we need something to do with them! How about homemade apple butter! The great thing about this recipe is that it takes so little time to make and you just put it in the slow cooker overnight and ta-da! Apple butter !
Ingredients:
6 lbs of Apples, peeled, cored and cut into large chunks
¾ cup of Granulated Sugar
¾ cup of Brown Sugar
1 ½ Tbsp of Pumpkin Pie Spice
½ tsp of Salt
2 tsp of Vanilla Paste
1st.

2nd
3rd

4th
5th
Special thanks to Laura Vitale for her recipe!
